After having connected your WhatsApp API number to your Interakt account, you might want to send bulk WhatsApp campaigns to your contacts. Before being able to send campaigns, you would need to add contacts into your Interakt account.
There are three ways of adding contacts in your account:
1. Sync contacts from TallyPrime
2. Add contacts 1 by 1 in Interakt
3. Upload contacts in bulk via CSV Upload
You can sync contacts from TallyPrime Release 4.0 from the Ledger Contact Details report.
1. In the TallyPrime application, press Alt+G (Go To) > type or select Ledger Contact Details > press Enter.
2. Press spacebar to select one or more ledger entries for which you have the Default WhatsApp No. available.
3. Press Alt+S (Send Contacts to Portal).
The contact details are received at Interakt and listed in your account.
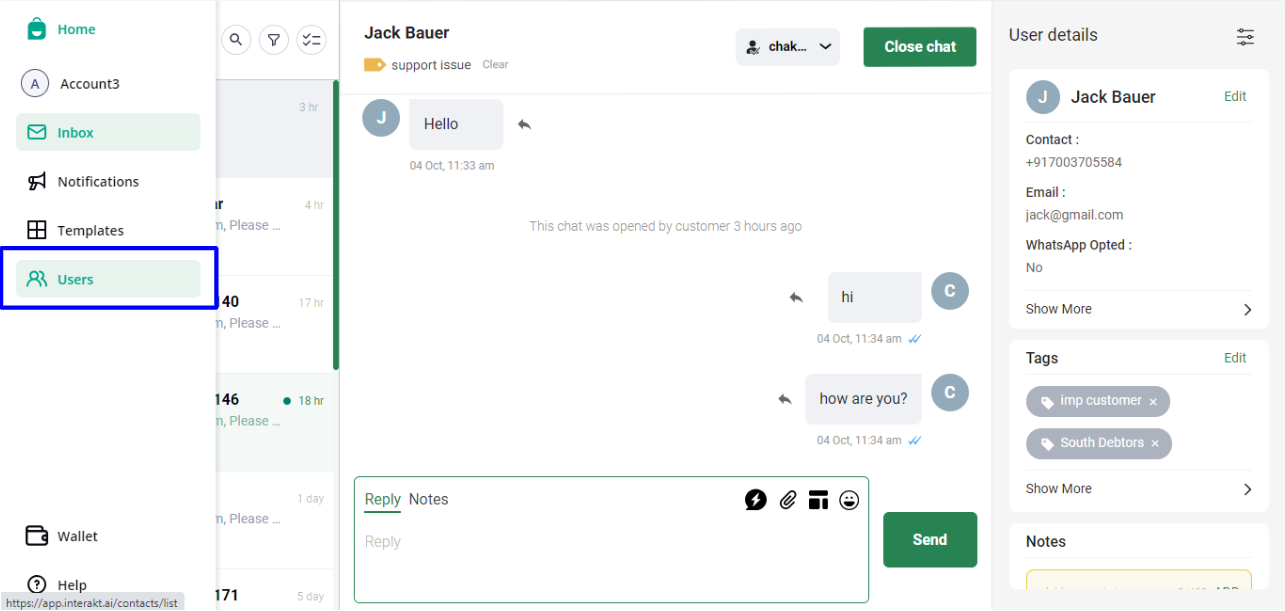
To add contacts 1 by 1 in Interakt, go to the Users section, by clicking ‘Users’ in the left navigation panel. Alternatively, go to https://app.interakt.ai/contacts/list.
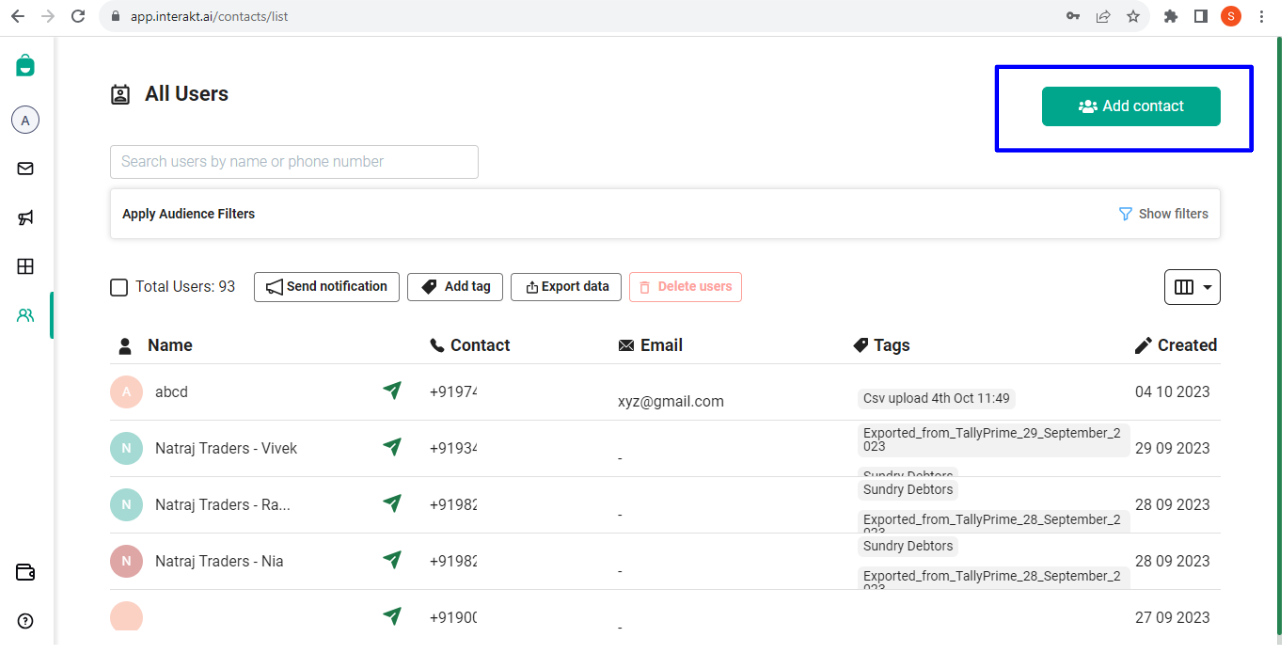
In the ‘Users’ page, click the ‘Add contact’ button at the top-right corner.
In the popup that opens, the ‘One by One’ option would be pre-selected. You will have to provide the following details of the contact that you want to add:
– First Name
– Last Name
– Email Address (optional)
– Country Code
– Phone Number
– WhatsApp Opted In Status
Then, click Add Customer.

After clicking ‘Add Customer’, you will see a green notification on the top right corner, as shown below.
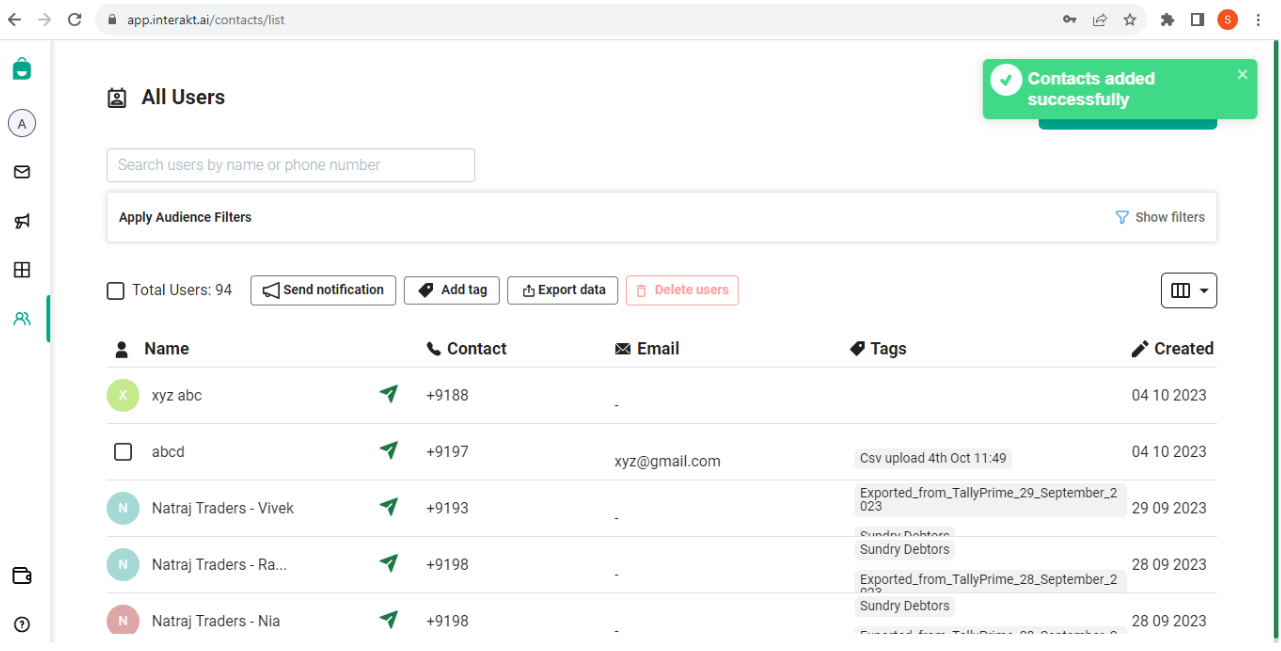
After that, refresh the page, and you will see the contact added by you, at the top of the Users table.

You can add contacts in bulk by uploading a CSV file (up to 50 MBs) in the right format.
To upload a CSV, go to the Users page (https://app.interakt.ai/contacts/list) and click the ‘Add Contact’ button at the top-right corner. In the popup that opens, click ‘Via Bulk Upload’, as shown below.
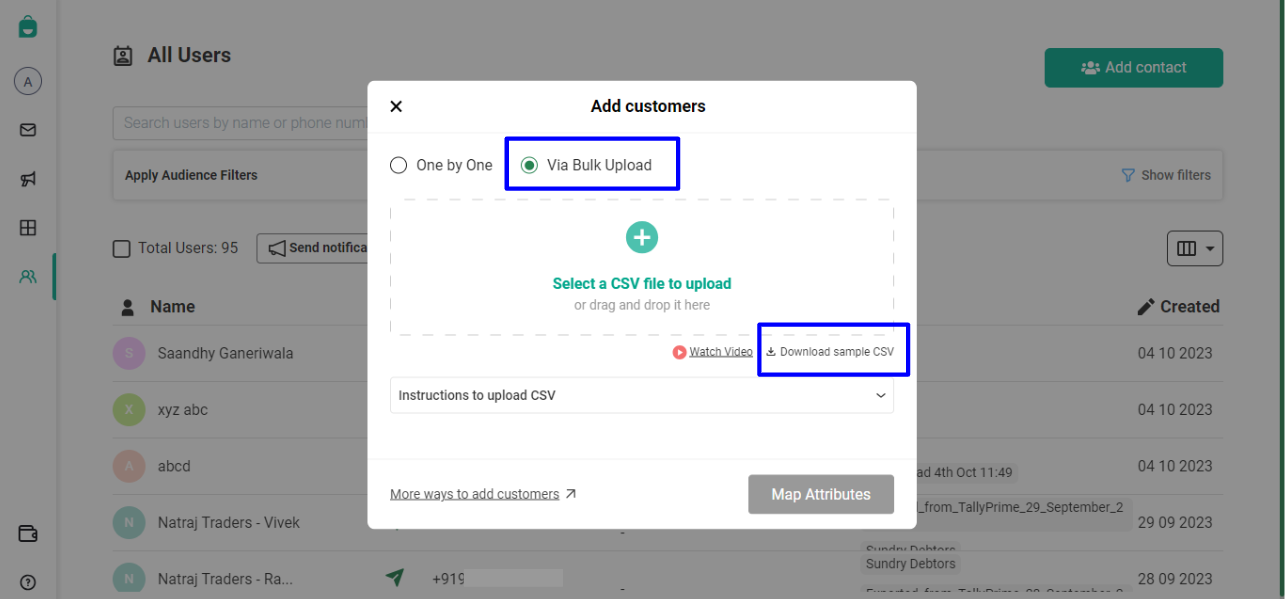
– Next, you can download a sample CSV file to understand the right format for your CSV file.
– Given below is a sample format that can be used for your CSV file. Some important points to keep in mind:
– CSV should mandatorily contain Phone Number & Country Code in any 2 columns (shown below in the blue box).
– To add the WhatsApp Opted status of a customer, include a column titled ‘WhatsApp Opted’ and enter either TRUE or FALSE as the column values.
– Apart from Phone Number, Country Code and WhatsApp Opted, you can include columns for custom fields like Name, E-mail, User ID, City, Area, Country, and so on.
– To add a datetime type field (for example, birth_date, last_order_date, and so on), please provide column values in ISO format. For example, if suppose you want to pass the date time as 31st October 2022 7:30 pm IST, you can do so in any of the below formats:
‣ 2022-10-31T19:30:00.000+05:30
‣ 2022-10-31T14:00:00Z
‣ 2022-10-31
-If a contact in the CSV already exists in your account, the existing contact’s fields or traits will be updated as per the columns given in the CSV (matching of contacts is done based on Phone Number).
– If 2 (or more) contacts in CSV have the same phone number, they might not be added.
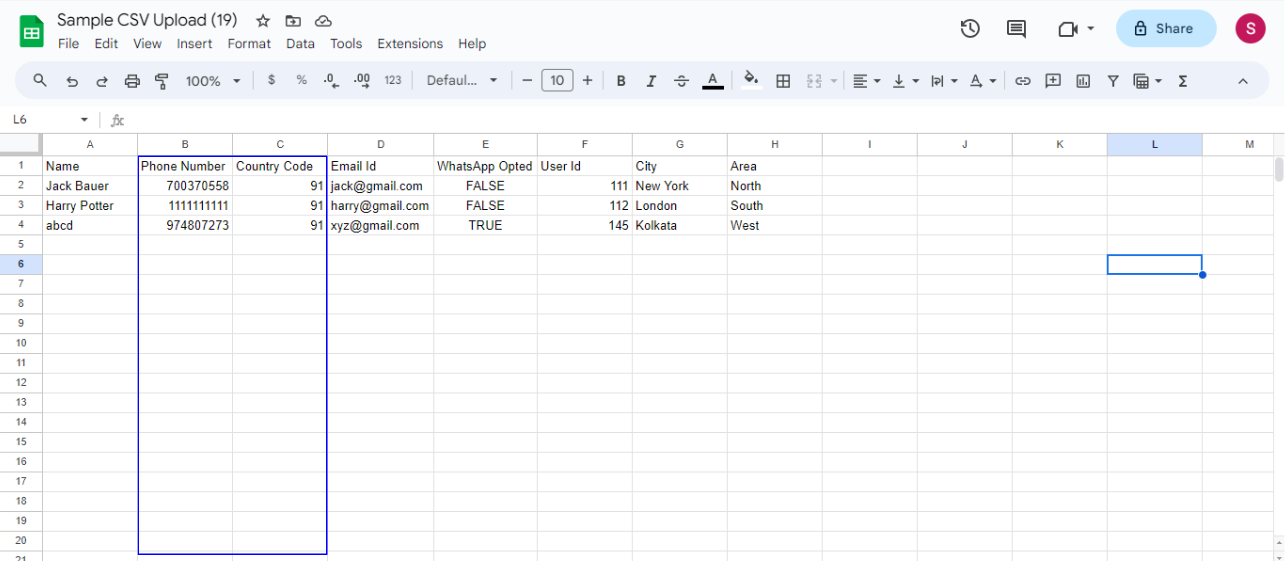
After having prepared your CSV file, click on ‘Select a CSV file to upload’ (in the popup) and choose the CSV file from your system. Once uploaded, you will see something like this:
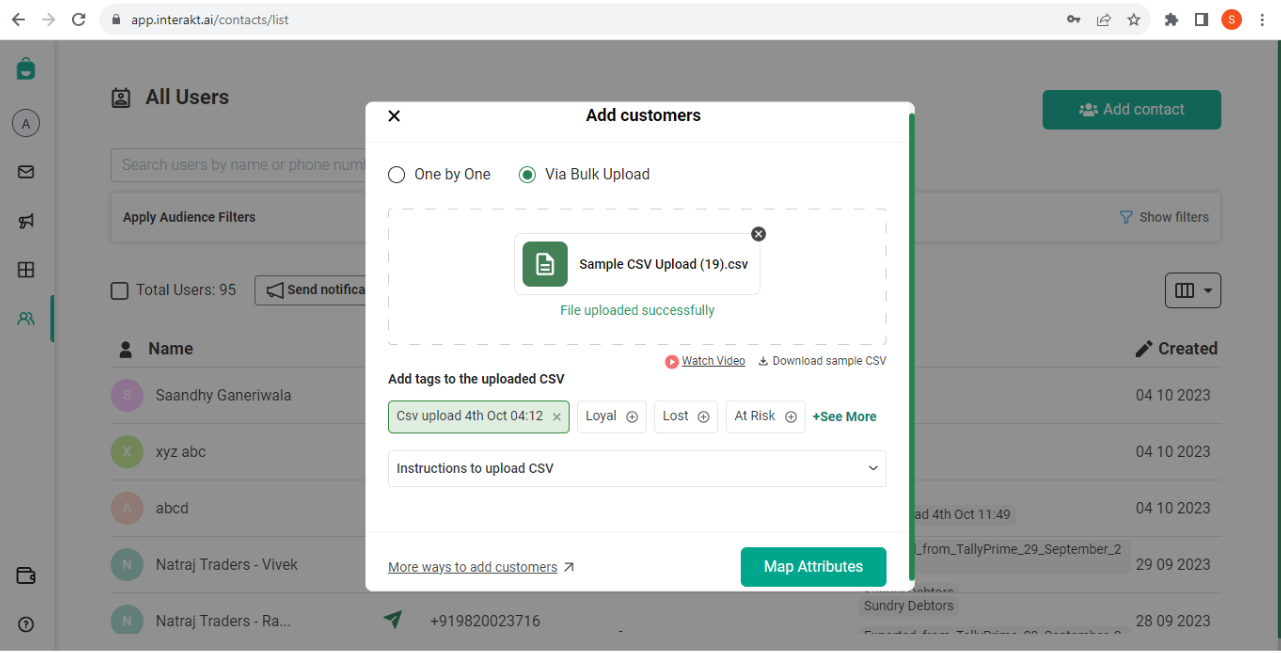
The tag ‘Csv upload 4th Oct 04:12’ has been auto-applied for this CSV file. What this means is that – all contacts uploaded via this CSV file will have this tag attached.
Similarly, you can add another tag by clicking on ‘See More’ and selecting another tag.
Next, click on Map Attributes.
Here, you will be required to map all columns in your uploaded CSV to fields in your Interakt account (also called attributes or traits), as shown below.
In this particular example:
For the columns Name, Phone Number, Country Code, WhatsApp Opted & User Id, the corresponding fields have been detected automatically.
For the columns Email Id, City and Area (shown in blue boxes), the system was not able to detect any existing fields. Hence, it shows ‘Creating new: Email Id’, ‘Creating new: City’ & ‘Creating new: Area’. This means that the fields ‘Email Id’, ‘City’ and ‘Area’ will be newly created to accommodate the values of the corresponding columns.

At this point, you can manually map any of the columns to an existing field. For example, suppose you know that a field named ‘Email’ exists in your Interakt account. You can click on the dropdown and select the ‘Email’ field from the list.
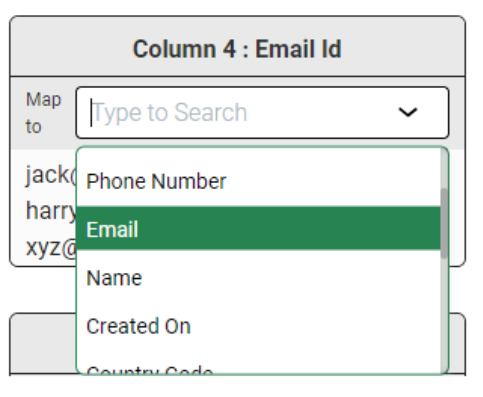
After having mapped all columns to fields, click on Confirm.
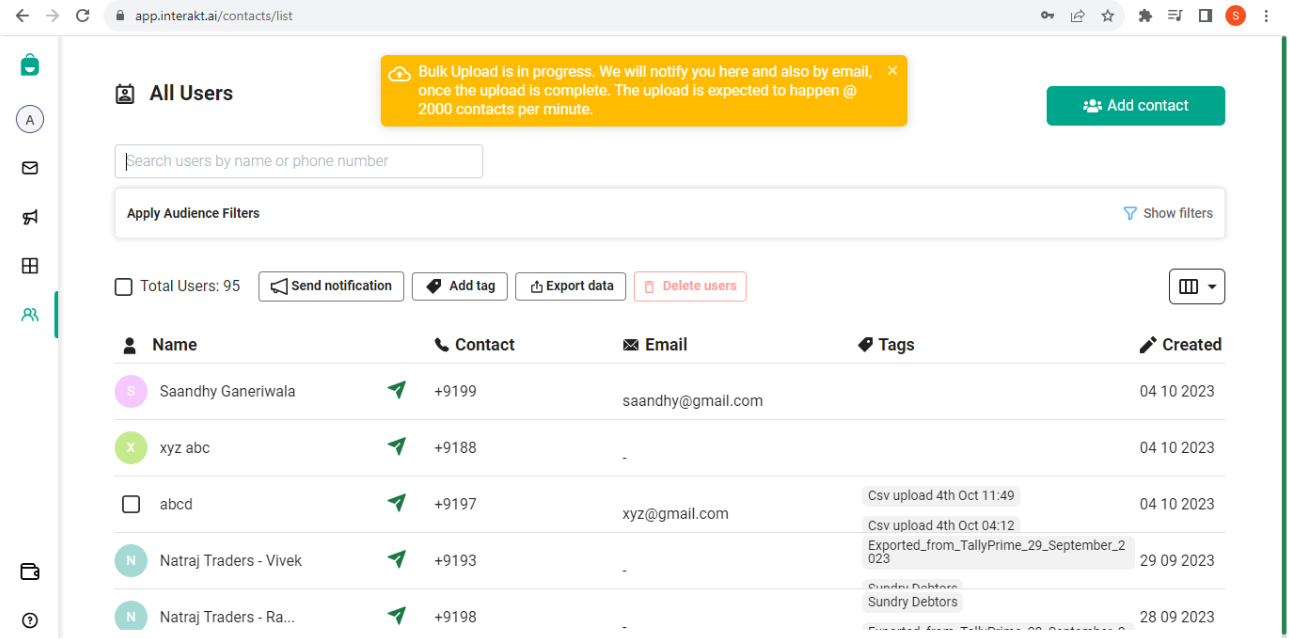
After that, your CSV upload will start getting processed. You will see an orange notification as shown below, informing you that your bulk upload is in progress. While the bulk upload is happening, you can navigate to other sections of your account, and continue using the account as is.
After the bulk upload process is complete, a green notification will appear, as shown below.
It will contain the number of successful and failed uploads. You can also click on ‘Download Error Report’ to download the report containing the reasons for failed uploads. You can click on ‘Send them a campaign’ to send a WhatsApp Bulk campaign to the uploaded contacts.

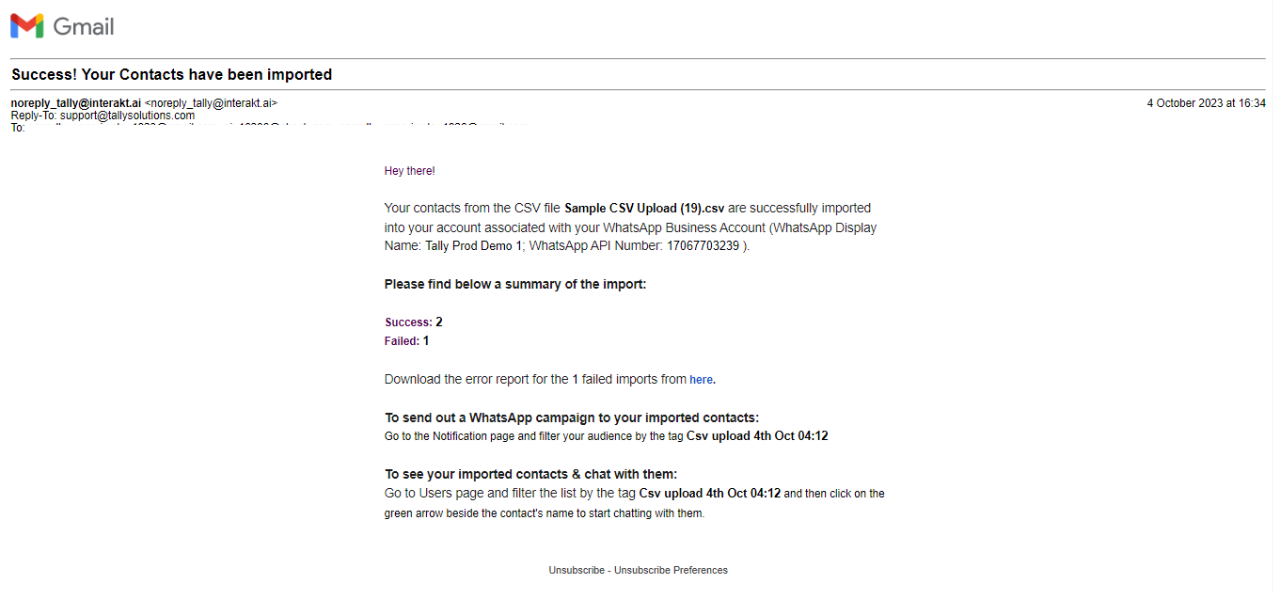
Moreover, you will also receive an email containing the results of the bulk upload process.
The error report for a bulk upload will look like the report shown below. The report will contain the list of contacts for which the upload failed. In the right-most column, the failure reason for every contact will be given. In the below report, the failure reason for the 1 failed upload was ‘Phone number is invalid’

After having uploaded contacts via CSV, you might want to carry out different actions on the uploaded contacts like sending a campaign to them / adding tags to them / exporting them etc.
To carry out these actions, you will first need to filter / segment your contacts list. You can filter the contacts list in 2 ways:
1. Filter via tags
2. Filter via user traits (i.e. contact fields)
To filter your contacts list via tags:
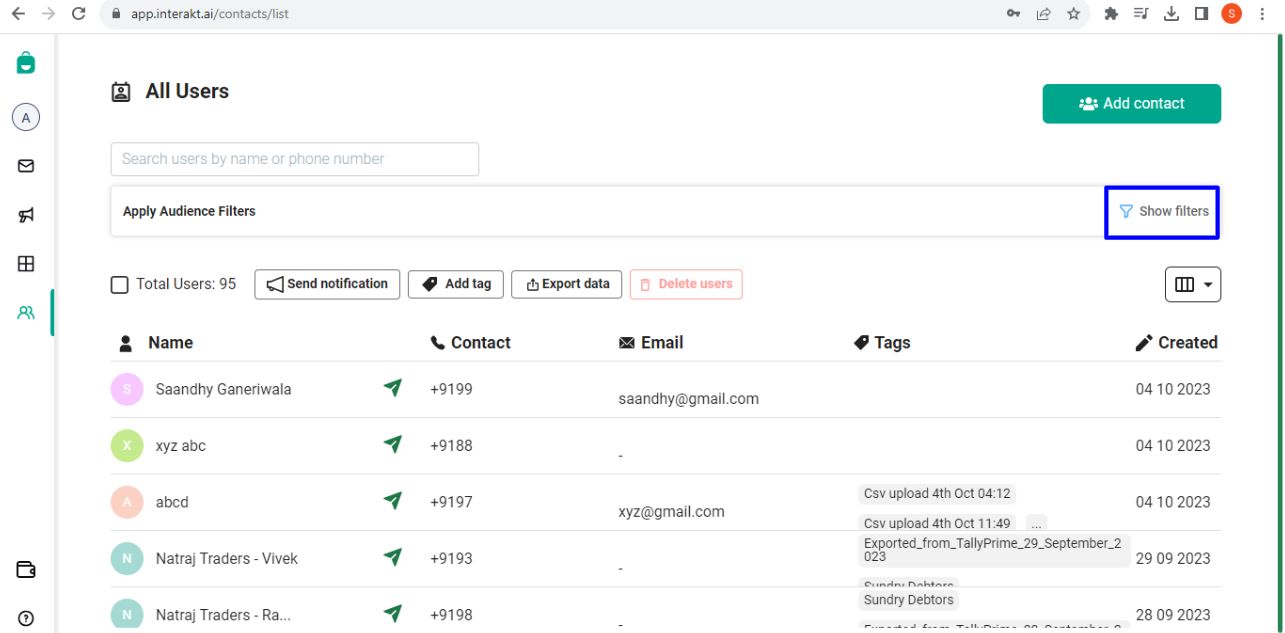
– Click on ‘Show Filters’ (as shown in the blue box below).
– Next, in the ‘FILTER BY TAGS’ section, you will be able to spot the tag that was applied to the contacts which you uploaded in the CSV i.e. Csv upload 4th Oct 04:12.
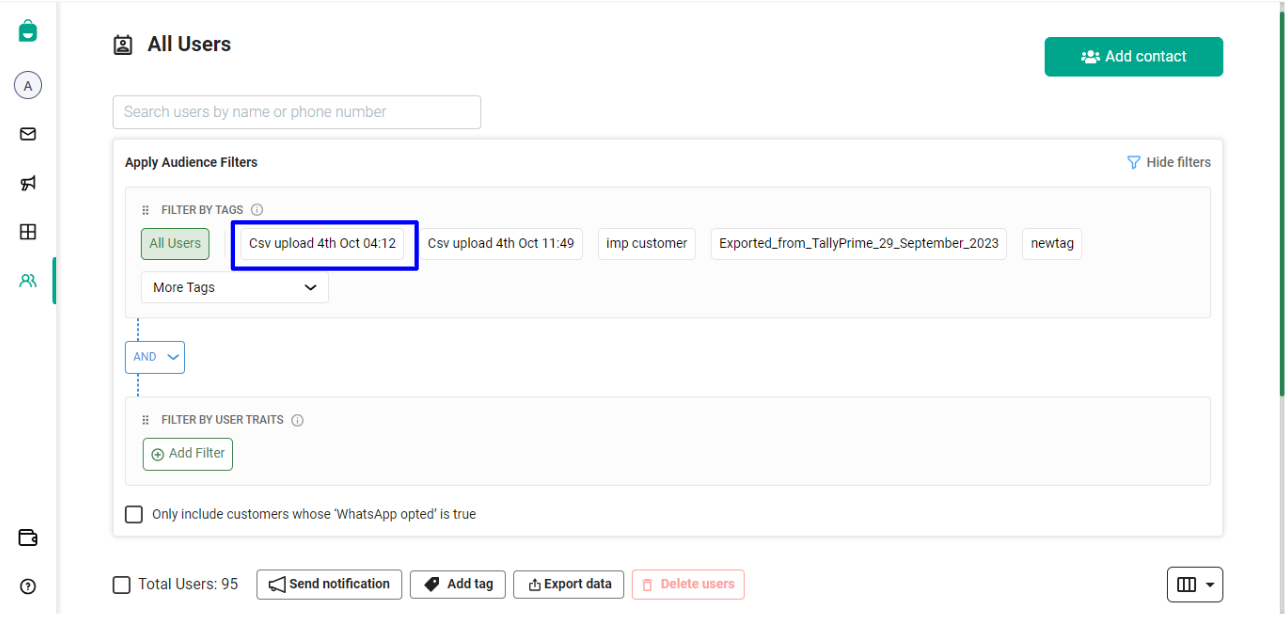
– Click on the tag, after which a dropdown will appear with 2 options ‘is’ and ‘is not’. Select ‘is’.
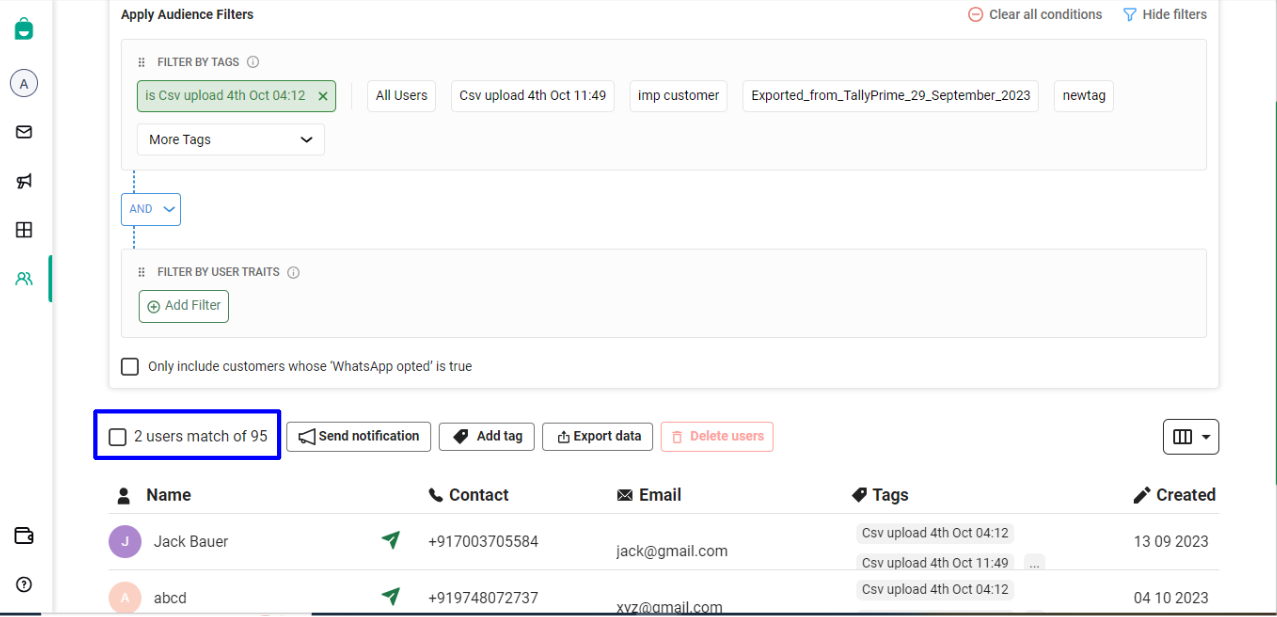
– The contacts having the tag Csv upload 4th Oct 04:12 will get filtered, like shown below. In the CSV that was uploaded, 2 out of 3 contacts had been uploaded successfully. Hence, 2 contacts have been filtered.
You can now carry out various actions on this filtered list of contacts:
Send WhatsApp Bulk Campaign – Click on the ‘Send Notification’ button. You will be taken to the page from where you can configure the campaign’s details.
Add tag – Click on the ‘Add tag’ button to add more tags to the filtered list of contacts.
Export data – Click on the ‘Export data’ button to export the filtered list of contacts in a CSV file. The exported file will be emailed to you.
Delete users – To delete the contacts, you will have to select contacts 1 by 1 and then click on the ‘Delete users’ button.
Usecase 1: For the uploaded list of contacts, you want to segment those contacts whose ‘City’ = ‘Kolkata’.
Steps:
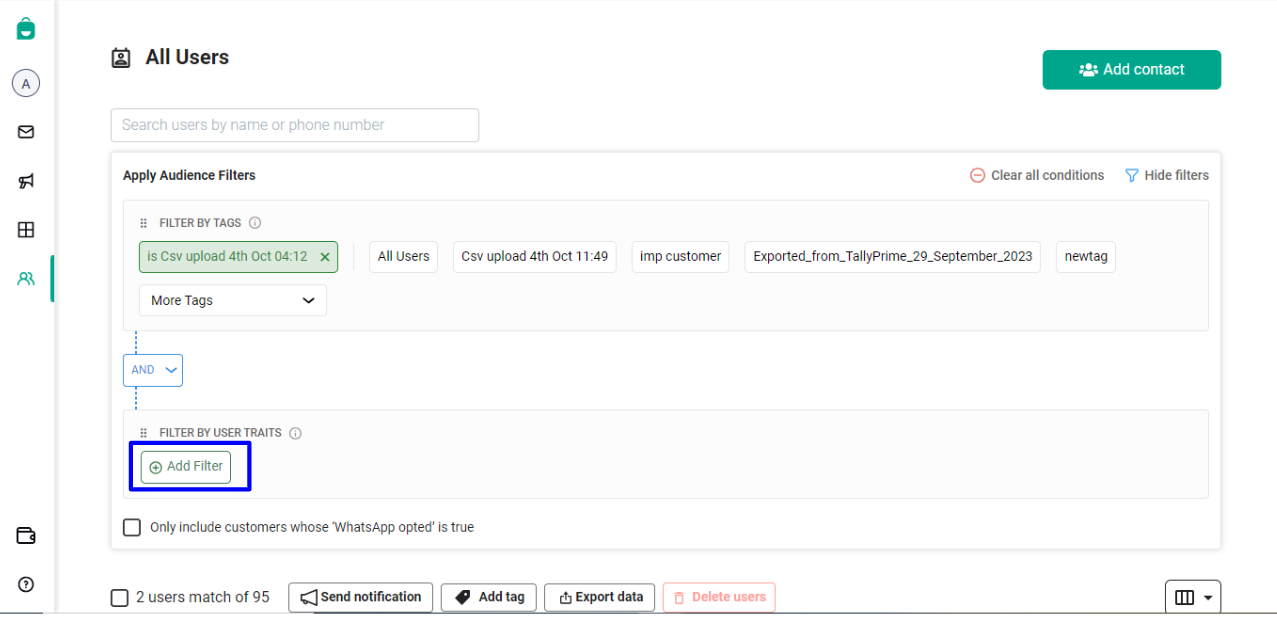
– After having filtered the list via the tag ‘Csv upload 4th Oct 04:12’, click on ‘Add Filter’ in the FILTER BY USER TRAITS section.
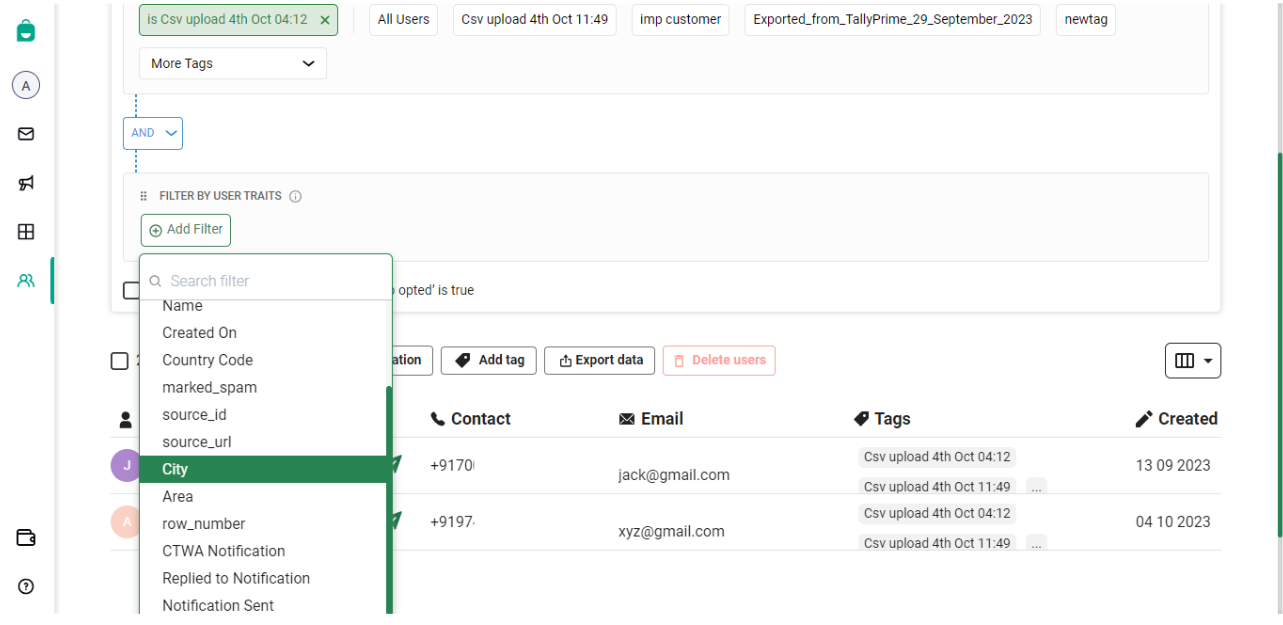
– Next, search for the field ‘City’ in the dropdown.
– Next, select ‘is’ from the list of filter conditions. You can also select ‘contains’.

– Next, type ‘Kolkata’ in the text box that appears.
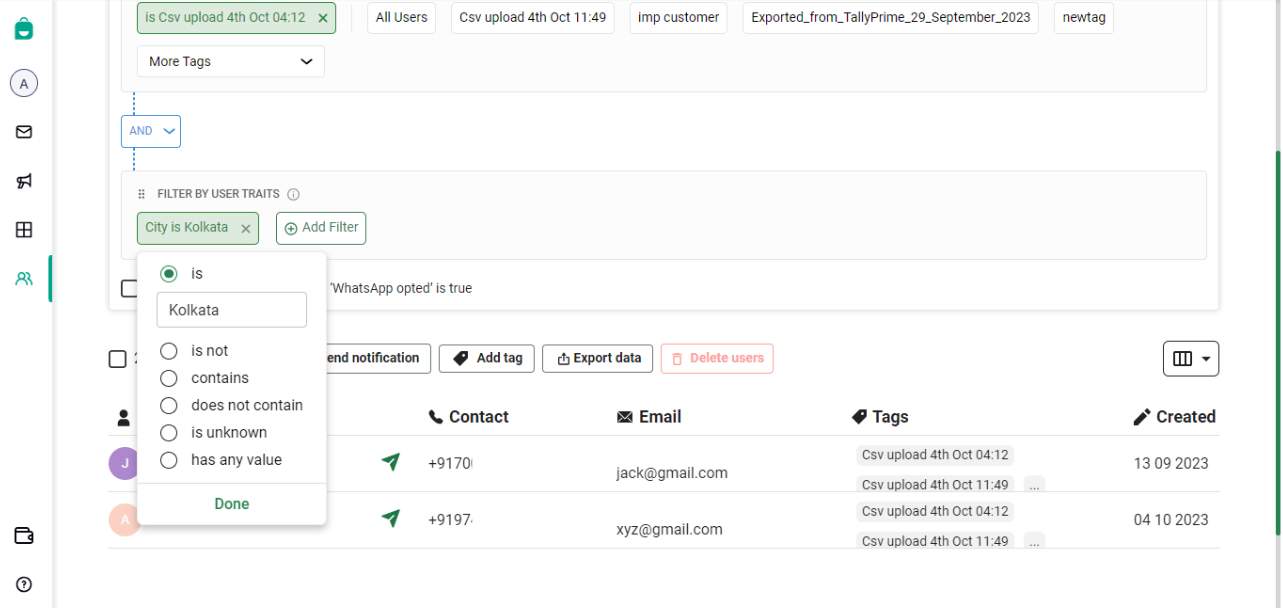
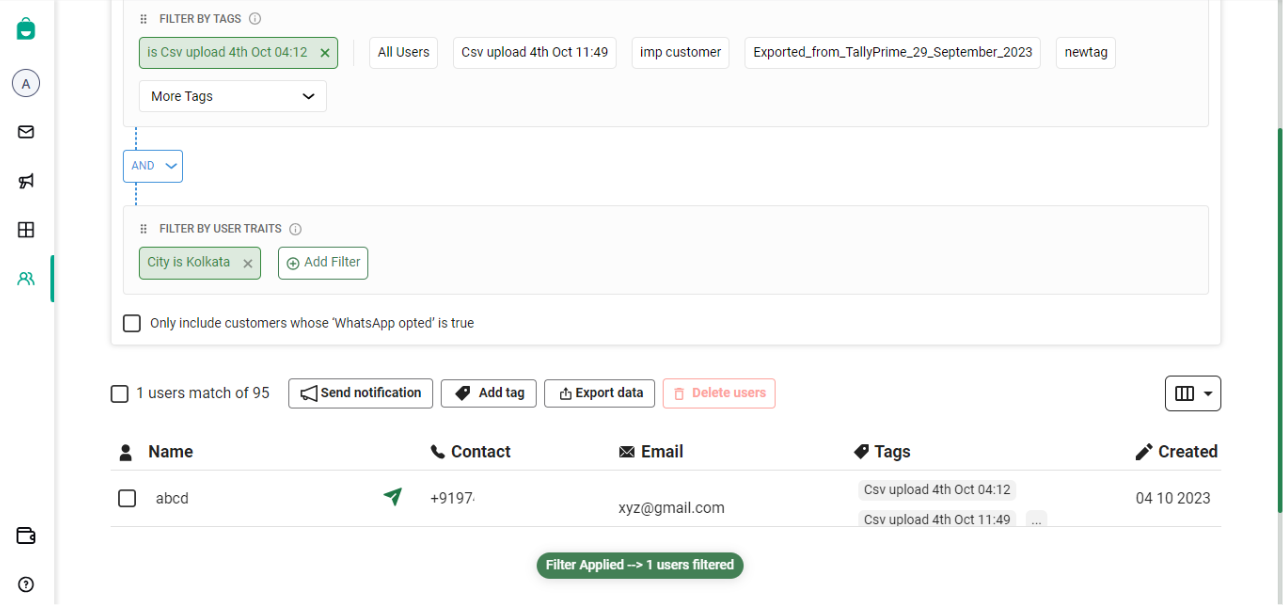
– Next, click on ‘Done’. The contacts list will get filtered and only those contacts will be displayed, for whom the field ‘City’ equals ‘Kolkata’.
Steps:
– After having filtered the list via the tag ‘Csv upload 4th Oct 04:12’, click on the checkbox for ‘Only include customers whose ‘WhatsApp opted’ is true’. This is shown below in the blue box.

– After clicking on the checkbox, the list will get filtered again. In our example, only 1 out of the 2 contacts had WhatsApp Opted = True. Hence, as shown below, only that 1 contact has been filtered.
