
Managing contacts in your CRM can be time-consuming, but with Basic Automations, you can set rules to ensure your contacts follow a structured journey. These rules help streamline your sales process, automate contact management, and reduce manual effort.
Why Use Basic Configuration?
1.Saves time by automating repetitive tasks.
2.Ensures consistency in handling contacts.
3.Improves team coordination by defining clear rules.
Here’s how you can set up Basic Automation Rules under Contact Settings in Interakt.
1. Default Status for New Contacts
Every new contact created in Interakt needs a starting status in the sales pipeline.
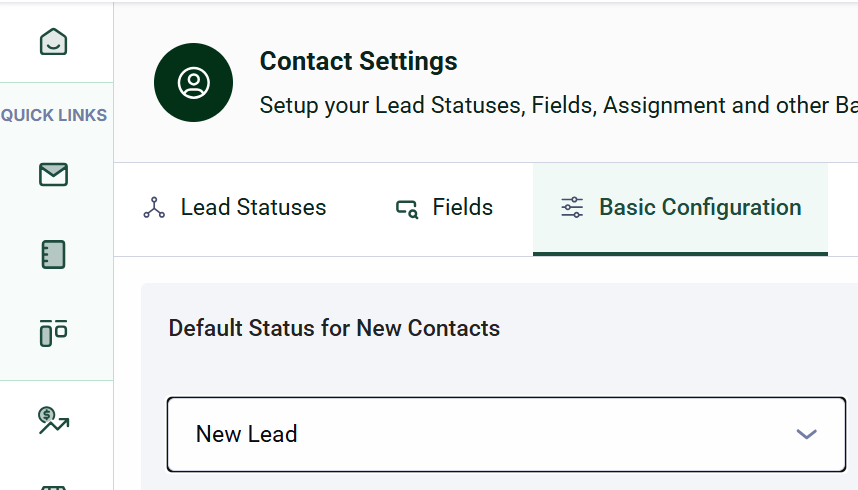
This automation ensures that all new contacts receive a default status when they are:
1. Created by a Sales Agent
2. Added via APIs with an assigned owner
How to Set It Up?
-Choose a default status from the dropdown list.
-This status will be automatically assigned to all new contacts.
Example:
If your sales process starts with a “New Lead” status, you can set this as the default. Every contact created will be labeled as a “New Lead” unless another status is assigned.
Important Notes:
-You must have a default status; it cannot be empty.
-The default status is pre-defined when setting up your organization.
It will also apply to contacts uploaded in bulk.
In Interakt, every contact follows a journey through your sales cycle—from the moment they are added to when they are converted (or lost). The Default Status ensures that all new contacts start from a predefined point in this journey.
What does this mean?
The Default Status is automatically assigned to a contact only in the following cases:
A Sales Role agent creates a contact via bulk upload but does not specify any status in the sheet.
A new contact is created when a customer sends a WhatsApp message for the first time.
However, when you’re manually adding a contact through a form on the Interakt dashboard, you will have the option to select the status yourself. In this case, the default status is not applied automatically.
Why is this important?
This helps maintain a consistent workflow so that every new contact starts in the right place within your pipeline.
Example:
Let’s say you run an online boutique. Your sales cycle includes the following statuses:
1️ New Lead (first status)
2️ Interested
3️ Negotiation
4️ Converted (closure status)
You set “New Lead” as the default status. Now:
When a Sales Agent adds a customer manually, they will appear as a New Lead unless another status is specified.
If your website captures leads via a form (API-based contact creation), those contacts will also start as New Lead.
2. Sales Closure Statuses
Closure statuses help categorize contacts that have completed their journey, whether successfully (e.g., “Closed Won”) or not (e.g., “Lost Deal”). Contacts in these statuses become visible to all non-sales roles in your organization.
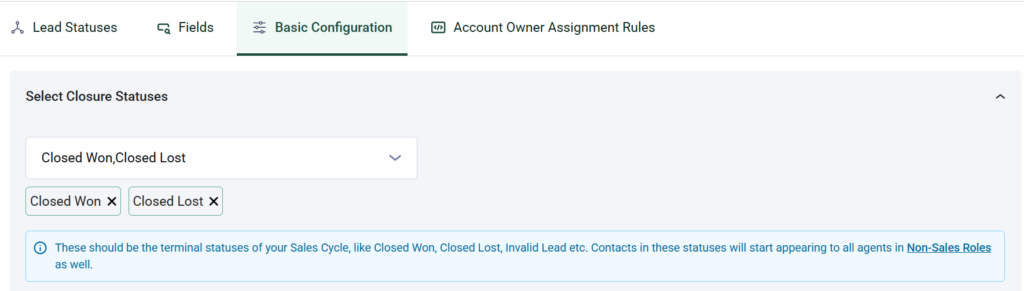
How to Set It Up?
-Select one or more closure statuses from the dropdown list.
-At least one closure status must always be selected.
-Clicking on the “Non-Sales Roles” hyperlinked text will take you to the Roles tab for better visibility.
Example:
A clothing brand using Interakt for WhatsApp sales can set up the following closure statuses
1.”Order Completed” – when a customer purchases successfully.
2.“Order Canceled” – when a lead doesn’t convert.
Important Notes:
-This must be a multi-select option.
-At no point can the list be empty, as it affects closure date calculations.
If only one closure status remains selected, it cannot be removed until another one is added.
Important Note
-Closed Won (you’ve successfully converted the lead), -Closed Lost (the deal didn’t go through), or -Invalid Lead (the lead was not relevant). Once a contact reaches any of these closure statuses, they are considered done from a sales perspective. At this point, the contact will become visible to all team members, including those in non-sales roles like Support, Operations, or Account Management — so they can take over if needed, for tasks like onboarding, customer support, or follow-ups. |
3 Sales Closure Timeline
This rule determines when a contact should be marked as “closed.” If a contact has not reached a closure status by this date, the system will notify the Account Owner via email.
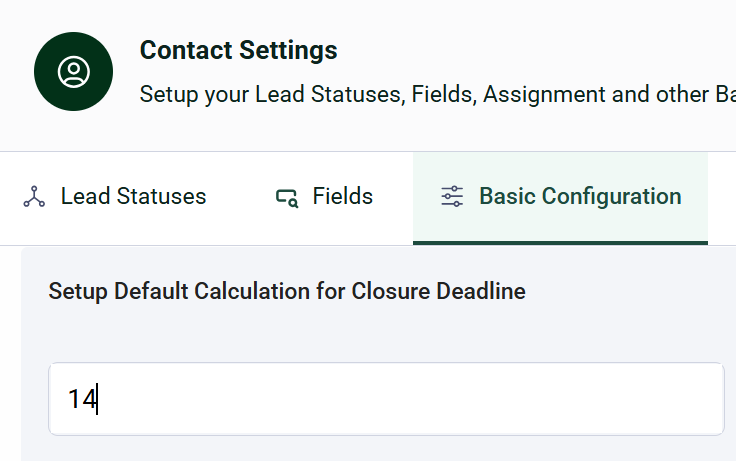
The Closure Deadline is the target date by which a contact (or lead) should ideally be closed — either won, lost, or marked as invalid.
How to Set It Up?
-When a contact enters your sales cycle (i.e., they’re assigned a sales status for the first time), Interakt automatically calculates a deadline based on the number of days you set.
For example: If the contact was created on 1st Jan 2025 and you’ve entered 14 days as your closure timeline, then the Closure Deadline will be 15th Jan 2025. This helps you track how long your team is taking to close leads.
-Sales agents can update this deadline later if needed.
-If the contact is still not closed (not moved to a closure status) by that deadline, Interakt will send a reminder email to the assigned account owner, so no lead slips through the cracks.
Important Notes: -The closure timeline is pre-populated, ensuring it is never left blank -A Save button is available to confirm changes |


