

We’re back with another automation platform to help you get your work done with interakt like a pro!
This time around, we’re covering Zapier. We’ll be getting into the nitty-gritty details of how you can use Zapier to integrate your interakt account with various CRMs and popular web applications.
Before we dive in, let me give you a quick overview of Zapier.
Zapier is a popular integration platform where multiple apps can be connected to automate workflows. Zapier lets you build connections to move data from one app to another with the help of triggers and actions. Zap is nothing but the name given to a connection that is made up of a single trigger and action.
Zapier connects over 3000 apps, most of which you use every day! There is no doubt that finding the fix to connect Zapier to your interakt account will help you build smarter workflows.
 3. For Trigger Event:
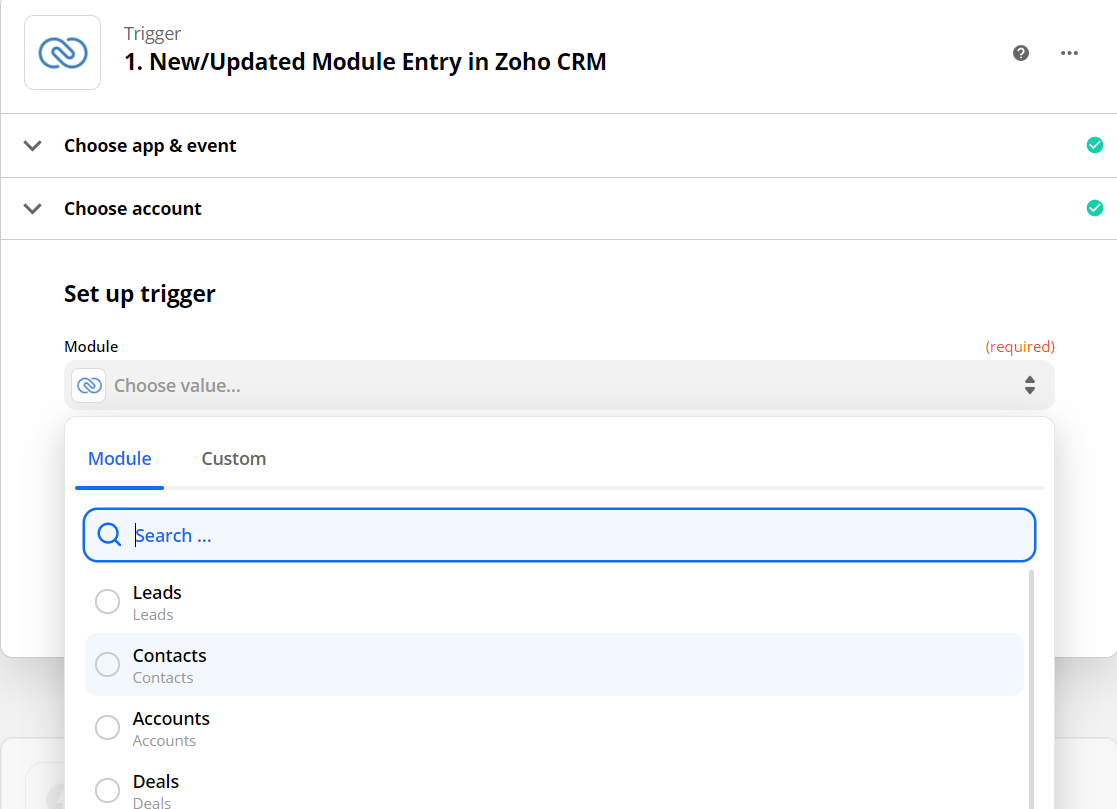
– In the case of Zoho CRM, choose the Trigger Event as ‘New/Updated Module Entry’’ – later you can select a particular Module (like Contacts, Calls) within which the event will be watched.
• Select Module as Contacts if you want contact details (added on Zoho) to get automatically added to interakt
• Select Module as Calls if you want user call activity to get automatically added for that user on interakt as an event
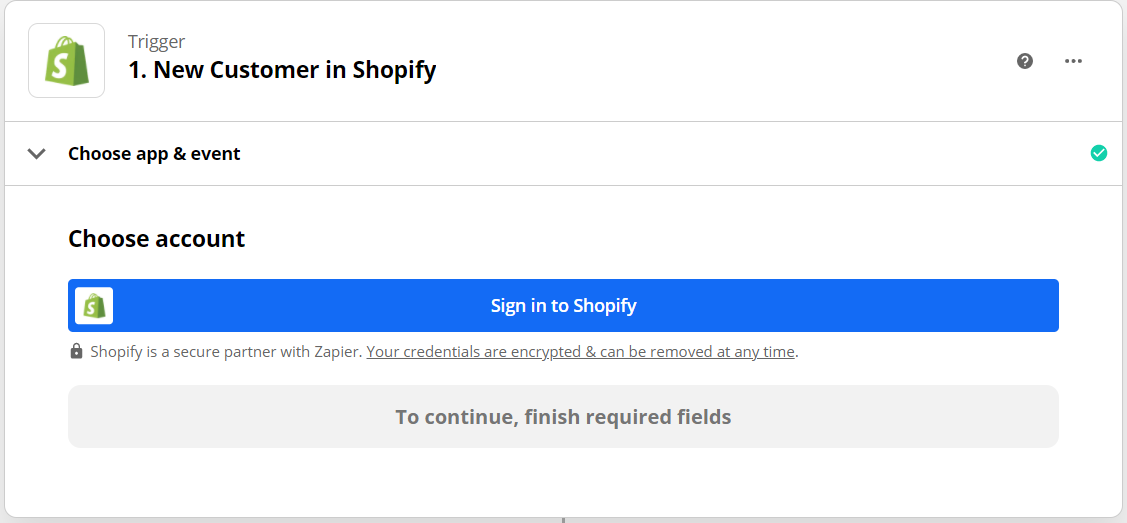
– In the case of Shopify, examples of Trigger Events which can be selected are:
• ‘New Customers’ – if you want to send details of a new customer to interakt
• ‘New Order’ – if you want to send details of a new order placement to interakt
• ‘New Abandoned Cart’ – if you want to send details of an abandoned check out event to interakt
3. For Trigger Event:
– In the case of Zoho CRM, choose the Trigger Event as ‘New/Updated Module Entry’’ – later you can select a particular Module (like Contacts, Calls) within which the event will be watched.
• Select Module as Contacts if you want contact details (added on Zoho) to get automatically added to interakt
• Select Module as Calls if you want user call activity to get automatically added for that user on interakt as an event
– In the case of Shopify, examples of Trigger Events which can be selected are:
• ‘New Customers’ – if you want to send details of a new customer to interakt
• ‘New Order’ – if you want to send details of a new order placement to interakt
• ‘New Abandoned Cart’ – if you want to send details of an abandoned check out event to interakt
 4. Next, you will need to connect your Zoho CRM / Shopify account with Zapier.
 5. After your account has been connected, you might need to select a module from your CRM / store wherein the Trigger will be watched (For example – in the case of Zoho, the selected ‘Module’ could be ‘Contacts’).
 6. Zapier will then try to test the trigger. It will search for:
• A recent entry in the selected module in your CRM Zoho, or,
• It will try to find a recent customer / order / cart abandonment instance on your online store Shopify
6. Zapier will then try to test the trigger. It will search for:
• A recent entry in the selected module in your CRM Zoho, or,
• It will try to find a recent customer / order / cart abandonment instance on your online store Shopify

 2. In ‘Action Event’, choose ‘Custom Request’.
 3. In ‘Method’ – choose Post
4. In the ‘URL’:
• If you are looking to add users (added in your CRM / software) to interakt, you can use: https://api.interakt.ai/v1/public/track/users/ • If you are looking to add events for a particular user (added in your CRM / software) to interakt, you can use: https://api.interakt.ai/v1/public/track/events/
5. ‘Request Data’ section:
a. If you are adding a user:
{“userId”: “X”,
“phoneNumber”: “Y”,
“countryCode”: “Z”,
“traits”: {
“name”: “A”,
“email”: “B”
}
}
• X, Y, Z, A, B are all fields in Zoho / other softwares, whose value will be taken as the value for the parameters in the API call ie “userId”, “phoneNumber”, “countryCode”, “name”, “email”.
• You may choose the fields (X, Y, Z, A, B) as per your use case.
• Specifying either of “userId” or (“phoneNumber” & “countryCode”) is mandatory.
• We strongly recommend specifying the “userId” since the same can be referenced if you want to add an event for the same user.
• You can add as many traits as required and map the trait values to corresponding fields in your software (shown below for Zoho).
3. In ‘Method’ – choose Post
4. In the ‘URL’:
• If you are looking to add users (added in your CRM / software) to interakt, you can use: https://api.interakt.ai/v1/public/track/users/ • If you are looking to add events for a particular user (added in your CRM / software) to interakt, you can use: https://api.interakt.ai/v1/public/track/events/
5. ‘Request Data’ section:
a. If you are adding a user:
{“userId”: “X”,
“phoneNumber”: “Y”,
“countryCode”: “Z”,
“traits”: {
“name”: “A”,
“email”: “B”
}
}
• X, Y, Z, A, B are all fields in Zoho / other softwares, whose value will be taken as the value for the parameters in the API call ie “userId”, “phoneNumber”, “countryCode”, “name”, “email”.
• You may choose the fields (X, Y, Z, A, B) as per your use case.
• Specifying either of “userId” or (“phoneNumber” & “countryCode”) is mandatory.
• We strongly recommend specifying the “userId” since the same can be referenced if you want to add an event for the same user.
• You can add as many traits as required and map the trait values to corresponding fields in your software (shown below for Zoho).
 b. If you are adding an event.
{“userId”: “X”
“event”: “call made”,
“traits”: {
“startime”: “S”
}
}
• Make sure X = the field which you mapped against the parameter ‘‘userId’’ when you added this user to interakt (via triggering of the zap for adding the user)
• You can name the “event” as you wish. Here the “event” name is given as “call made”.
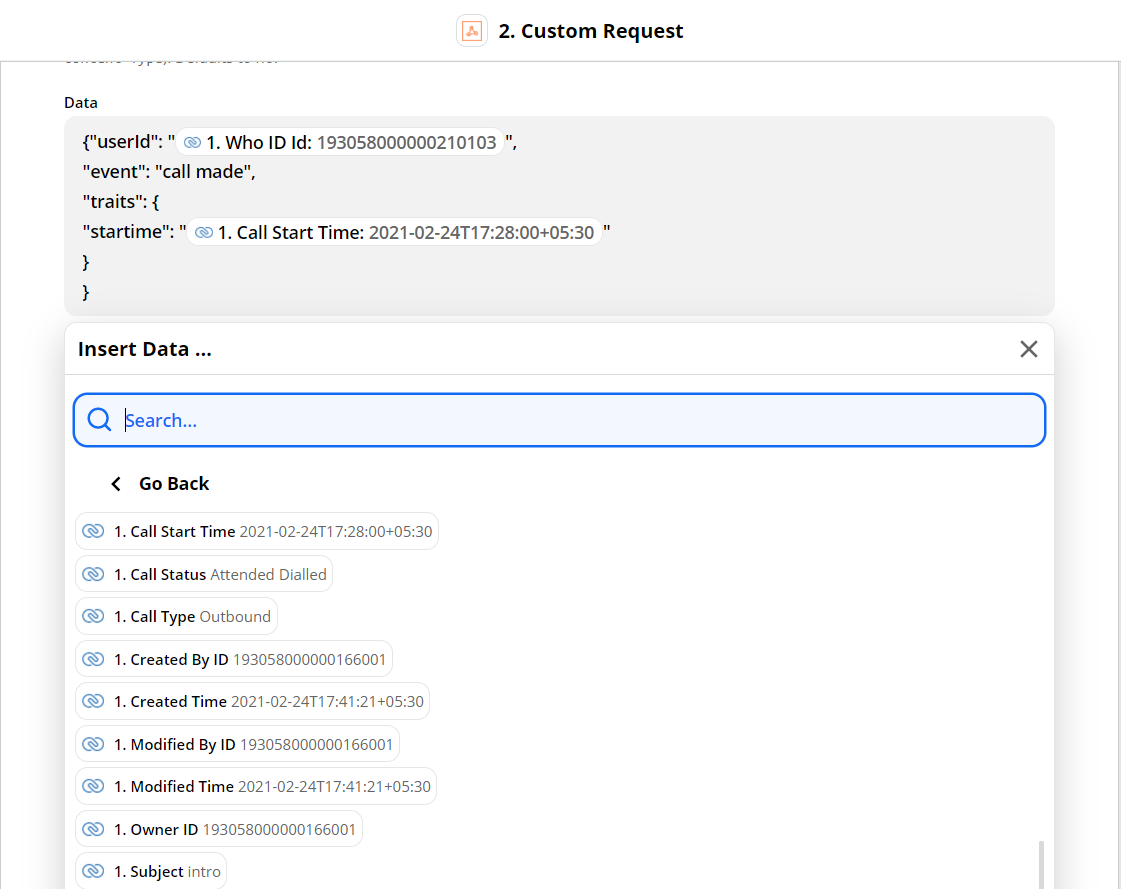
• You can give as many traits for the event as you wish. Here we have specified one trait “startime” which is mapped to S i.e. the “Call Start Time” field in Zoho.
b. If you are adding an event.
{“userId”: “X”
“event”: “call made”,
“traits”: {
“startime”: “S”
}
}
• Make sure X = the field which you mapped against the parameter ‘‘userId’’ when you added this user to interakt (via triggering of the zap for adding the user)
• You can name the “event” as you wish. Here the “event” name is given as “call made”.
• You can give as many traits for the event as you wish. Here we have specified one trait “startime” which is mapped to S i.e. the “Call Start Time” field in Zoho.
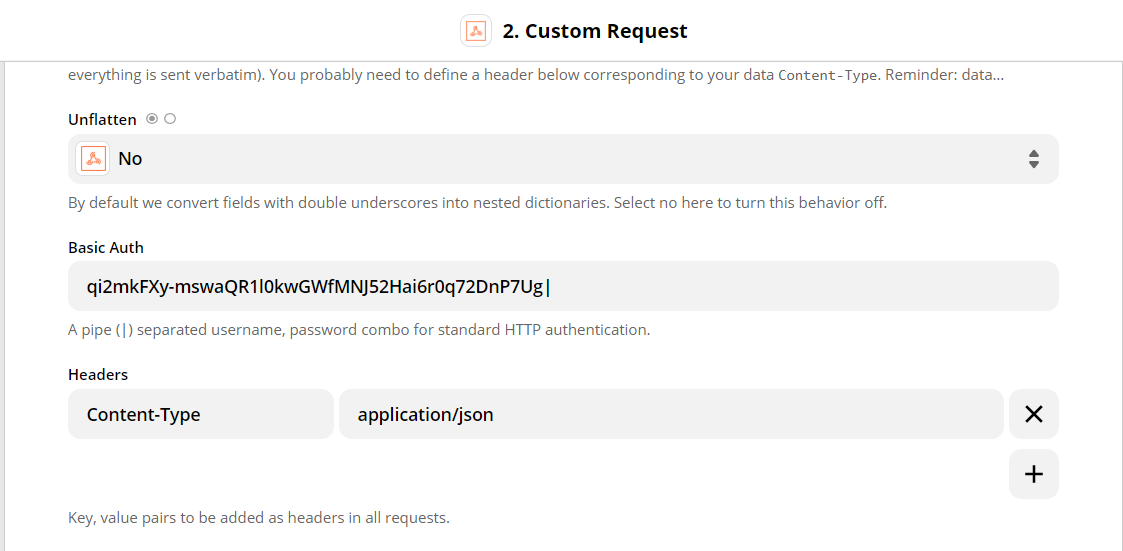
 6. In ‘Unflatten’, choose No.
7. In ‘Basic Auth’, use the Base64 decoded version of the API key given in your account’s Developer Settings (remove the “:” at the end of the Base 64 decoded version and add a “|” there)
8. In ‘Headers’, provide ‘Content-Type’ as ‘application/json’
9. Then click on Continue.
6. In ‘Unflatten’, choose No.
7. In ‘Basic Auth’, use the Base64 decoded version of the API key given in your account’s Developer Settings (remove the “:” at the end of the Base 64 decoded version and add a “|” there)
8. In ‘Headers’, provide ‘Content-Type’ as ‘application/json’
9. Then click on Continue.
 OR
• Add a new action for the user in your CRM / get the user to take an action on your store (for example: here we show what happens when we add a new Call for the contact that we created in Zoho in the previous step)
OR
• Add a new action for the user in your CRM / get the user to take an action on your store (for example: here we show what happens when we add a new Call for the contact that we created in Zoho in the previous step)
 • Then click on ‘Test & Continue’ on Zapier.
• Now, you will know that the Zap has worked if either of the below response messages are displayed:
– ‘Customer with <id> updated successfully’ (if you are looking to add / update a user)
– ‘Event created successfully’ (if you are looking to add an event)
• Then click on ‘Test & Continue’ on Zapier.
• Now, you will know that the Zap has worked if either of the below response messages are displayed:
– ‘Customer with <id> updated successfully’ (if you are looking to add / update a user)
– ‘Event created successfully’ (if you are looking to add an event)
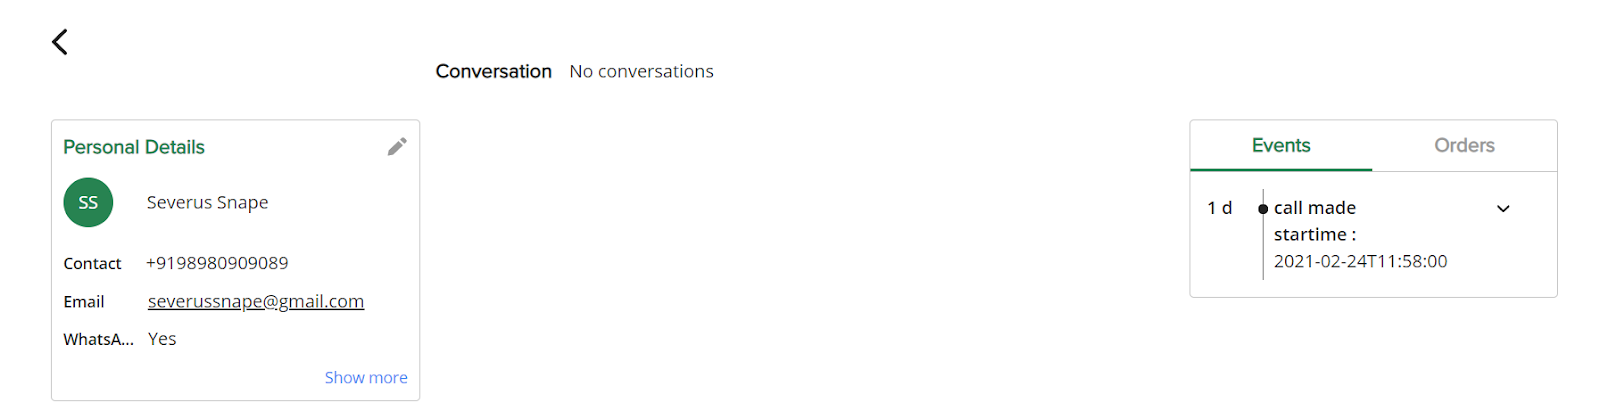
 • You could also check the result on your interakt account:
– Refresh the ‘Users’ page to see if the new user got added there or not.
• You could also check the result on your interakt account:
– Refresh the ‘Users’ page to see if the new user got added there or not.
 To check whether modification of the contact in your CRM / store translates into the contact being modified on interakt, this is what you need to do: • Modify one of the field values of the contact you added (the field should have been used in the ‘Request Data’ above) • Again, test the Zap in Zapier • Check if the modules get executed. • Go to your interakt account’s user page to check if the contact details got updated there
Here’s why syncing your interakt account with Zapier is of paramount importance
• You will get the full picture about your user and have more context while chatting with them on interakt • This will aid you in setting up automated WhatsApp notifications via interakt Not convinced yet? No problem, let me help you understand this better with a few uses cases that you may relate to: 1. Whenever a new contact is added in your CRM (like Salesforce, Freshdesk, LeadSquared, Zoho etc), or when a new user signs up on your online store (like Shopify, Magento, WooCommerce etc) they will be automatically added to your interakt account if you’ve connected Zapier to interakt. 2. Or say you have made an update to an existing user’s details – it could be a change in any attribute of that contact (like Name / Email id / Lead Status etc) on your CRM. Connecting interakt with Zapier will have this update reflected automatically in your interakt account. 3. Last one – integrating Zapier to your interakt account will also help you create events automatically for users whenever you enter an activity related to that contact (like a call / meeting / deal) on your CRM, or whenever that user takes an action on your online store (like selecting products, abandoning carts, placing an order, making payment). There you have it! We’ve made our case. Let’s get down to business now. Automate workflows on interakt with Zapier
We’re breaking this down into simple steps to help you use Zapier to automate workflows between your CRMs and interakt: • Getting Started with Zapier • Creating a Trigger • Creating an Action • Testing the Connection • Setting the Connection Live • Sending an Automatic WhatsApp Notification via interaktGetting Started with Zapier:
You can create a free account on Zapier, or choose any of their paid plans, starting from $20 per month. In a free account, you will get 100 tasks, while the $20 plan will give you 750 tasks per month. Since our method below makes use of a premium app ‘Webhooks by Zapier’, you would necessarily have to purchase a paid plan on Zapier to use the premium app. So what would count as a Task on Zapier? A single lead that gets added in your CRM will in turn get added automatically on interakt and this would be counted as 1 task. You also have the option to explore Integromat for connecting your CRM and softwares with interakt. Integromat provides a $9 plan in which you may get to use the equivalent of 5000 Zapier tasks. Here’s the flow you need to follow on Zapier: 1. You need to specify a Trigger that will take place in your Software. Zapier will look out for that Trigger. 2. Whenever the trigger happens, Zapier will execute an Action via ‘Webhooks by Zapier’. The Action would be an API call to interakt’s API endpoint. Let’s understand this better: • Creating a Trigger – The Trigger steps will vary depending on the software you have chosen. • Creating an Action – The Action steps will be uniform. While specifying the JSON Request Data of the API call, you will be required to select the particular fields (from the software with which you are integrating) whose values need to be mapped to the parameters in the API call. You will have to take care to select the right fields. We have shown the fields you should select while integrating with Zoho.Creating a Trigger
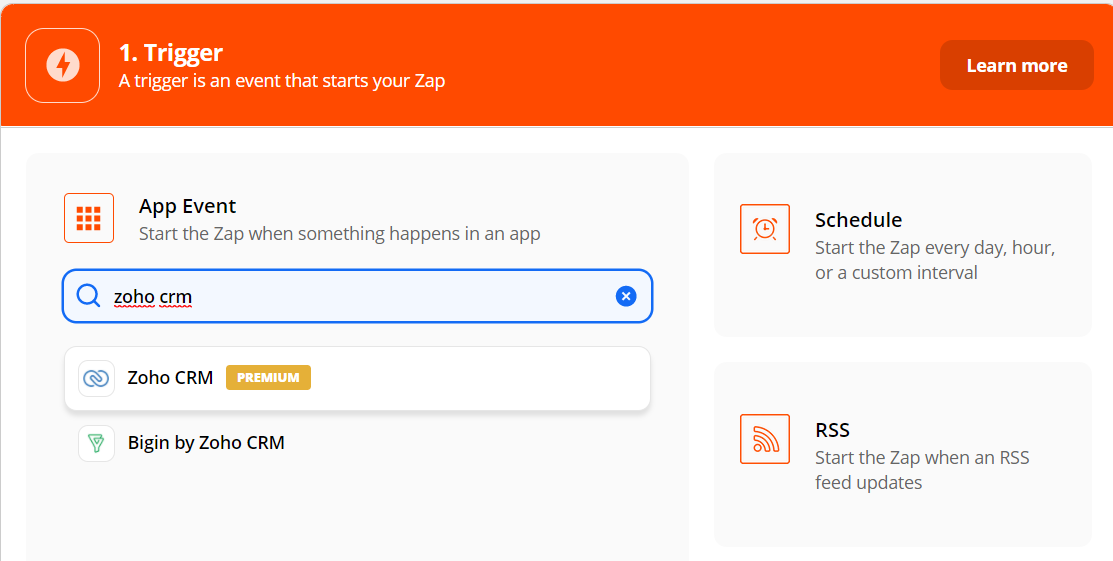
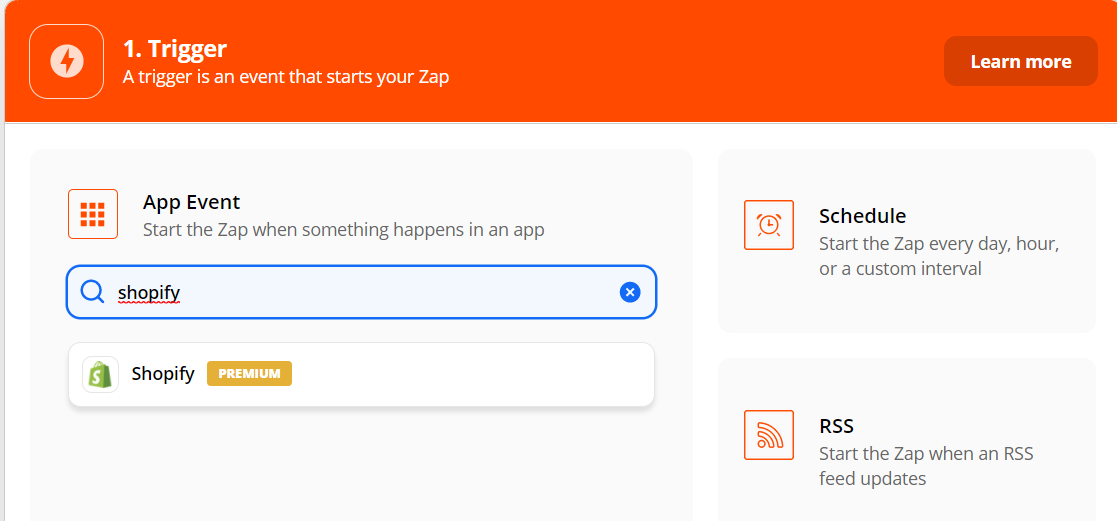
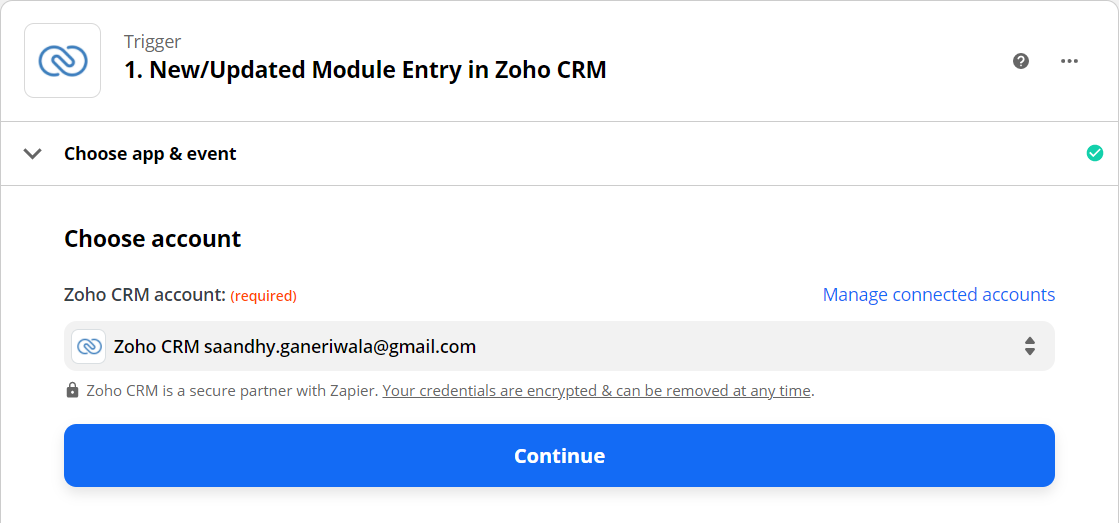
1. In your Zapier account, click on ‘Create Zap’. 2. For the Trigger event, choose the app where the trigger event will occur.
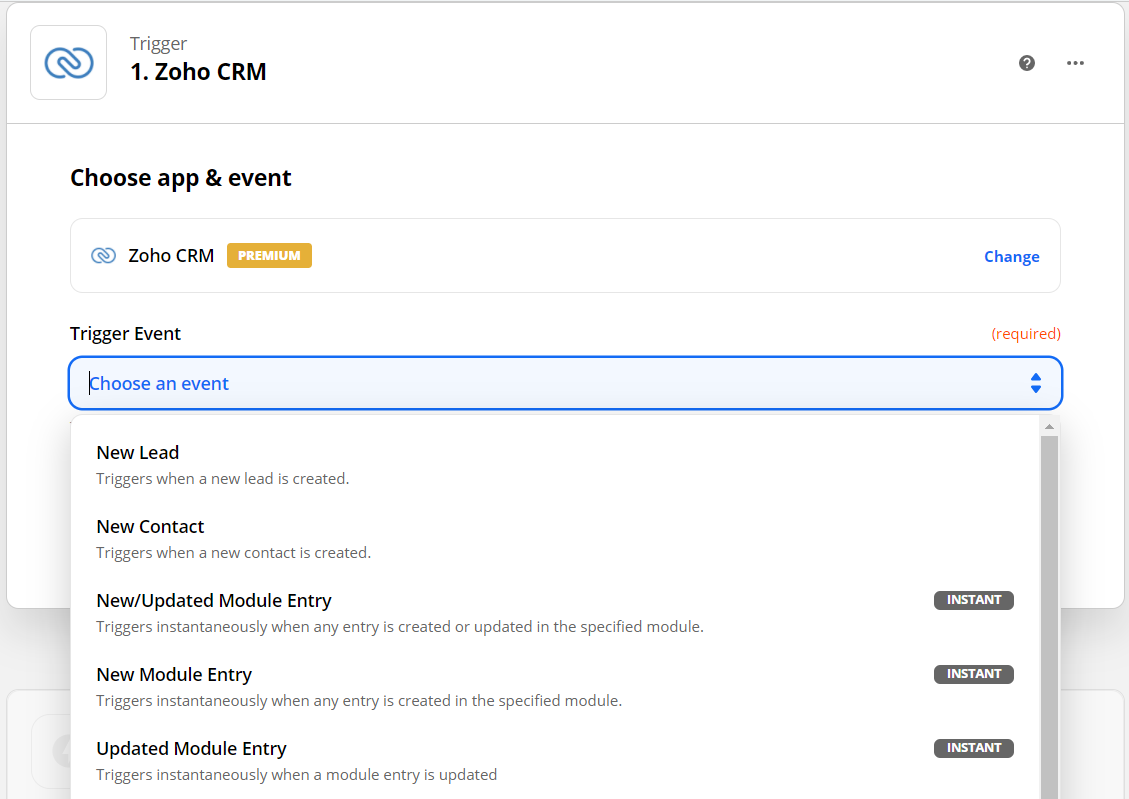
3. For Trigger Event:
– In the case of Zoho CRM, choose the Trigger Event as ‘New/Updated Module Entry’’ – later you can select a particular Module (like Contacts, Calls) within which the event will be watched.
• Select Module as Contacts if you want contact details (added on Zoho) to get automatically added to interakt
• Select Module as Calls if you want user call activity to get automatically added for that user on interakt as an event
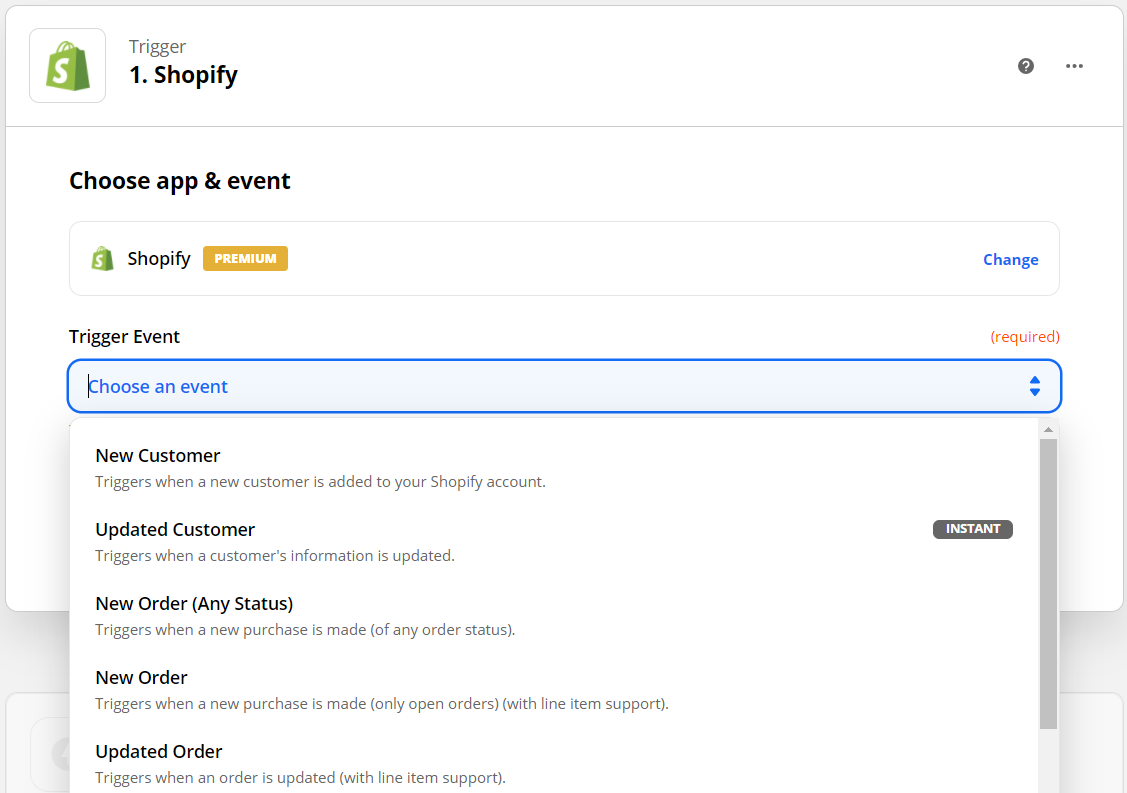
– In the case of Shopify, examples of Trigger Events which can be selected are:
• ‘New Customers’ – if you want to send details of a new customer to interakt
• ‘New Order’ – if you want to send details of a new order placement to interakt
• ‘New Abandoned Cart’ – if you want to send details of an abandoned check out event to interakt
4. Next, you will need to connect your Zoho CRM / Shopify account with Zapier.
5. After your account has been connected, you might need to select a module from your CRM / store wherein the Trigger will be watched (For example – in the case of Zoho, the selected ‘Module’ could be ‘Contacts’).
6. Zapier will then try to test the trigger. It will search for:
• A recent entry in the selected module in your CRM Zoho, or,
• It will try to find a recent customer / order / cart abandonment instance on your online store Shopify
Creating an Action
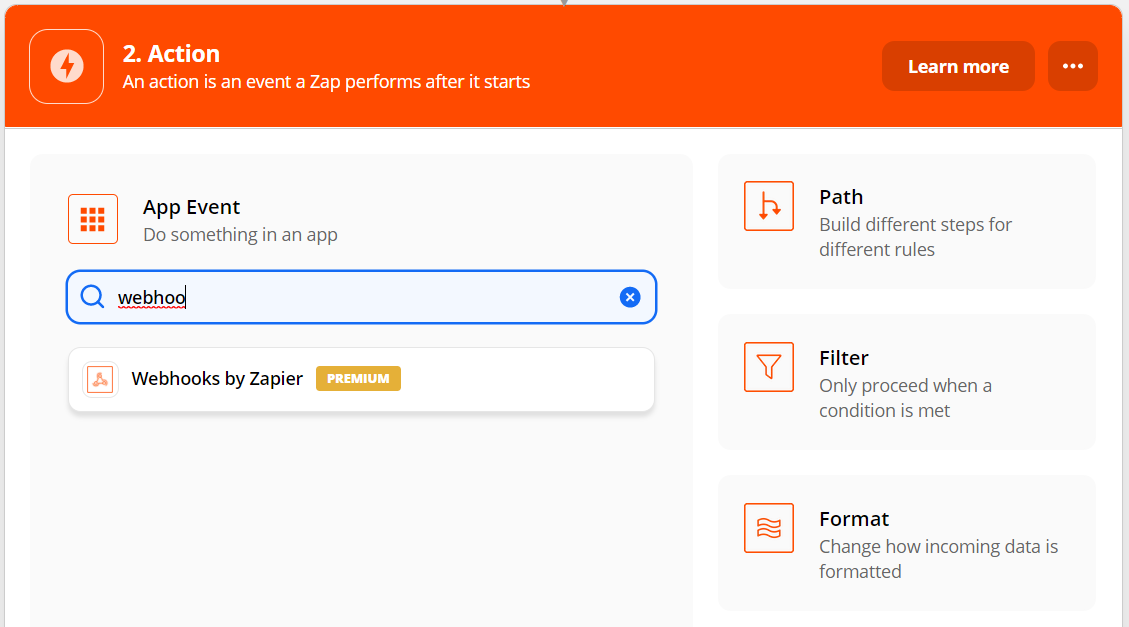
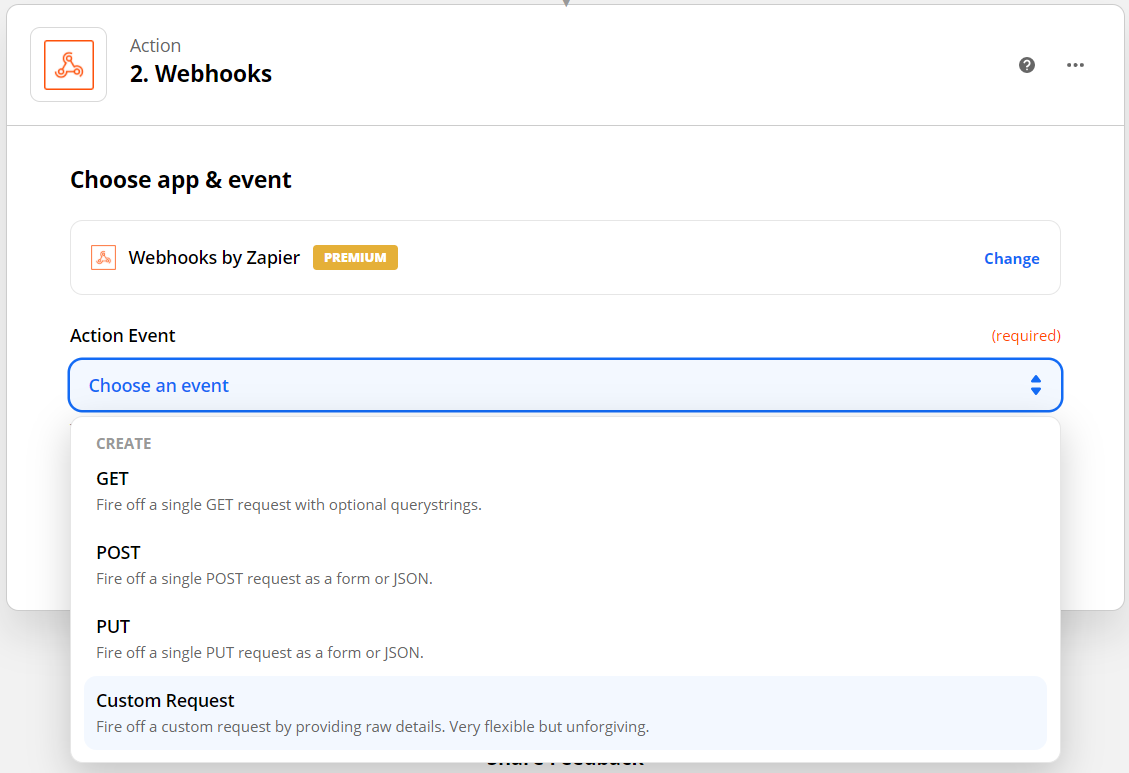
1. Once the trigger is tested successfully, click on ‘Continue’. For the ‘Action event’, select the app named ‘Webhooks by Zapier’.
2. In ‘Action Event’, choose ‘Custom Request’.
3. In ‘Method’ – choose Post
4. In the ‘URL’:
• If you are looking to add users (added in your CRM / software) to interakt, you can use: https://api.interakt.ai/v1/public/track/users/ • If you are looking to add events for a particular user (added in your CRM / software) to interakt, you can use: https://api.interakt.ai/v1/public/track/events/
5. ‘Request Data’ section:
a. If you are adding a user:
{“userId”: “X”,
“phoneNumber”: “Y”,
“countryCode”: “Z”,
“traits”: {
“name”: “A”,
“email”: “B”
}
}
• X, Y, Z, A, B are all fields in Zoho / other softwares, whose value will be taken as the value for the parameters in the API call ie “userId”, “phoneNumber”, “countryCode”, “name”, “email”.
• You may choose the fields (X, Y, Z, A, B) as per your use case.
• Specifying either of “userId” or (“phoneNumber” & “countryCode”) is mandatory.
• We strongly recommend specifying the “userId” since the same can be referenced if you want to add an event for the same user.
• You can add as many traits as required and map the trait values to corresponding fields in your software (shown below for Zoho).
b. If you are adding an event.
{“userId”: “X”
“event”: “call made”,
“traits”: {
“startime”: “S”
}
}
• Make sure X = the field which you mapped against the parameter ‘‘userId’’ when you added this user to interakt (via triggering of the zap for adding the user)
• You can name the “event” as you wish. Here the “event” name is given as “call made”.
• You can give as many traits for the event as you wish. Here we have specified one trait “startime” which is mapped to S i.e. the “Call Start Time” field in Zoho.
6. In ‘Unflatten’, choose No.
7. In ‘Basic Auth’, use the Base64 decoded version of the API key given in your account’s Developer Settings (remove the “:” at the end of the Base 64 decoded version and add a “|” there)
8. In ‘Headers’, provide ‘Content-Type’ as ‘application/json’
9. Then click on Continue.
Testing the Connection
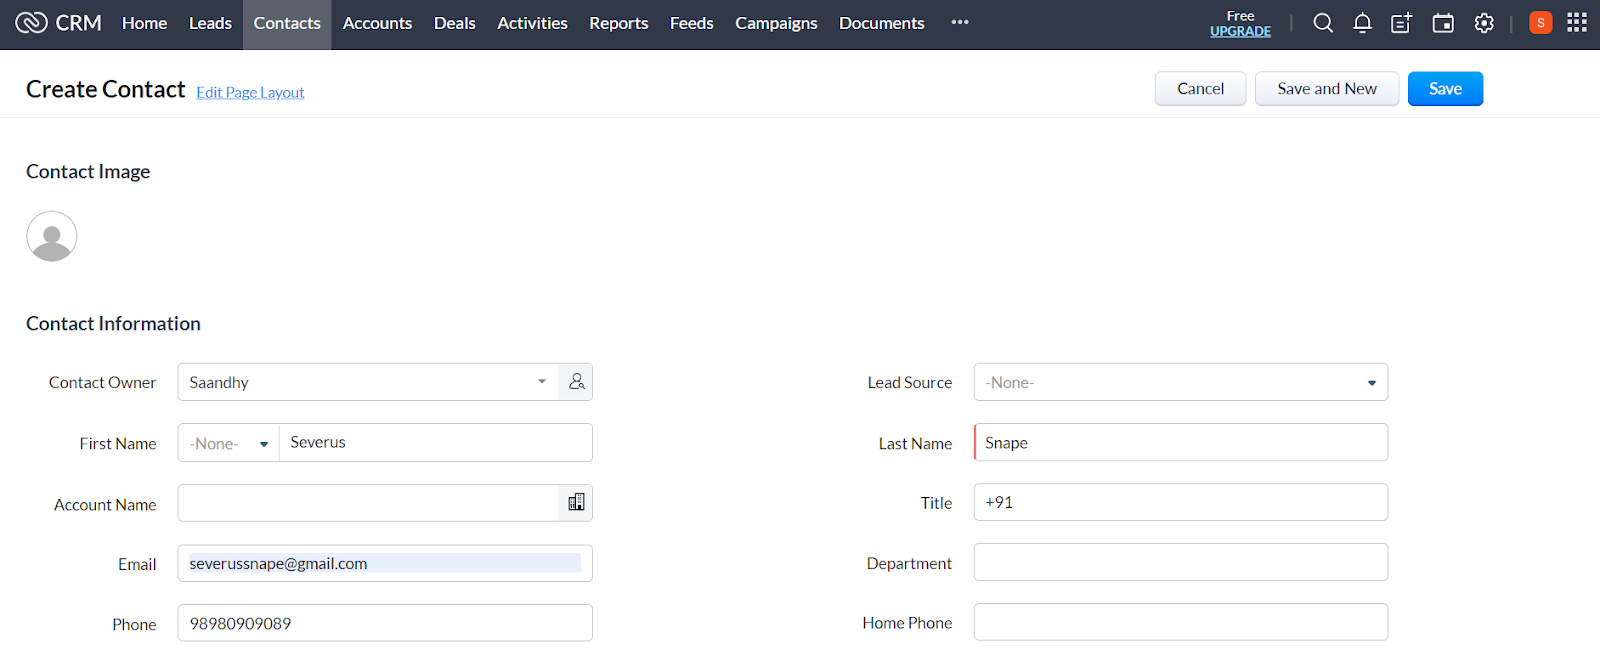
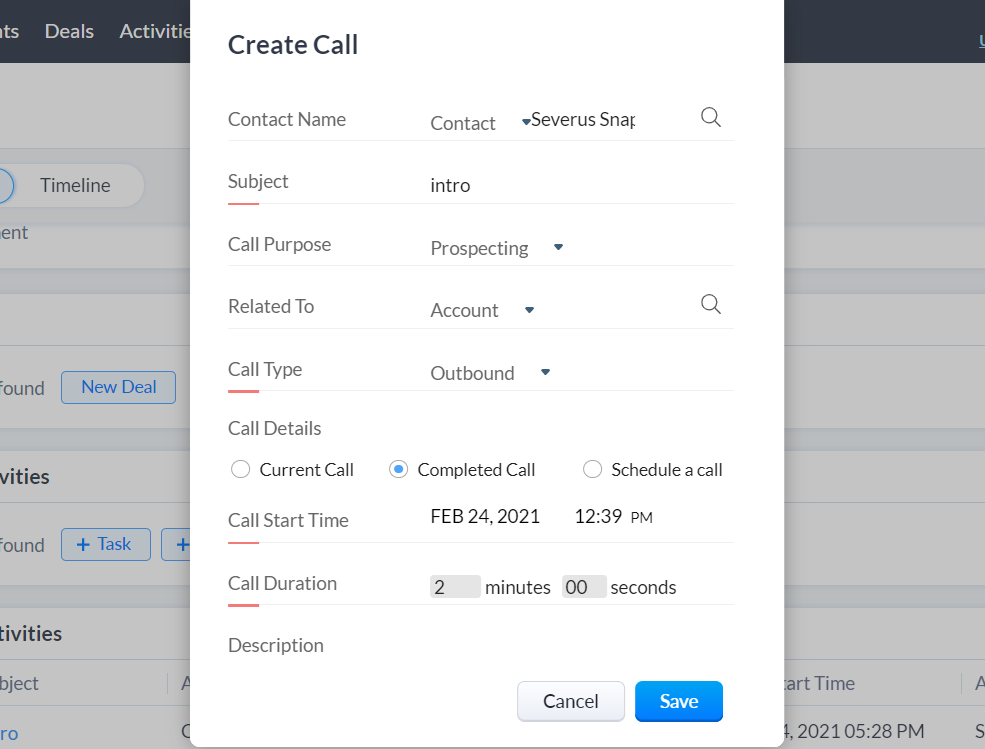
10. So we’re almost there – before you take it live, you need to first test if the above connection works or not. For this, you could: • Add a new user in your CRM / get a new user to sign up on your store (for example: here we show what happens when a new contact is created in the Contacts Module of Zoho)
OR
• Add a new action for the user in your CRM / get the user to take an action on your store (for example: here we show what happens when we add a new Call for the contact that we created in Zoho in the previous step)
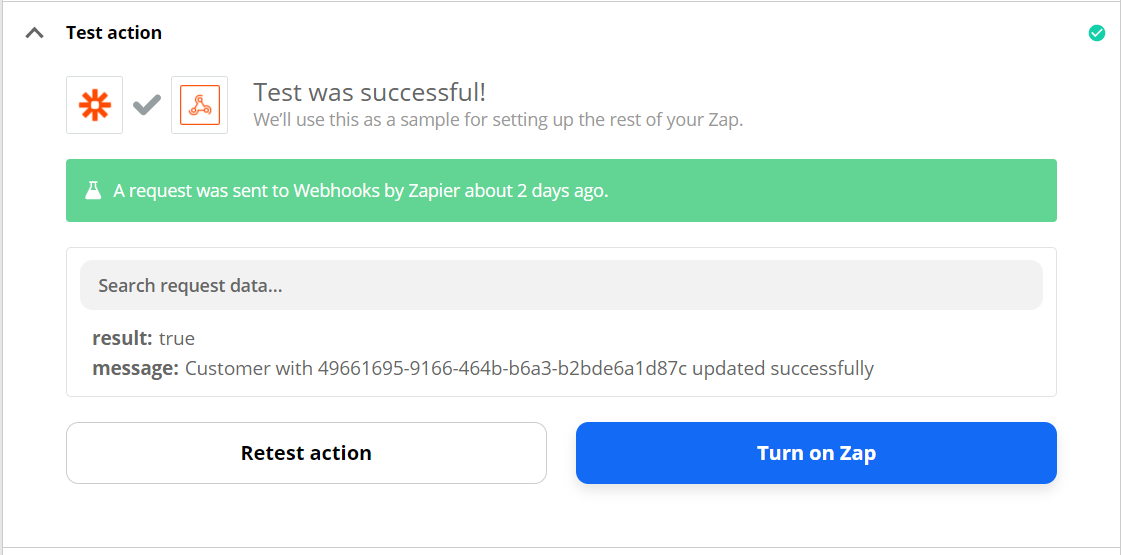
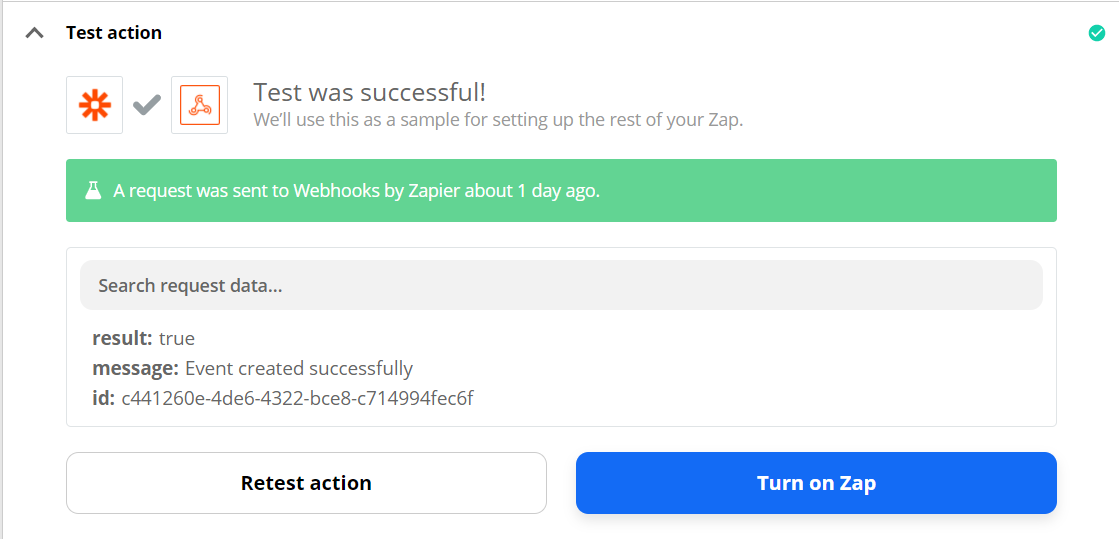
• Then click on ‘Test & Continue’ on Zapier.
• Now, you will know that the Zap has worked if either of the below response messages are displayed:
– ‘Customer with <id> updated successfully’ (if you are looking to add / update a user)
– ‘Event created successfully’ (if you are looking to add an event)
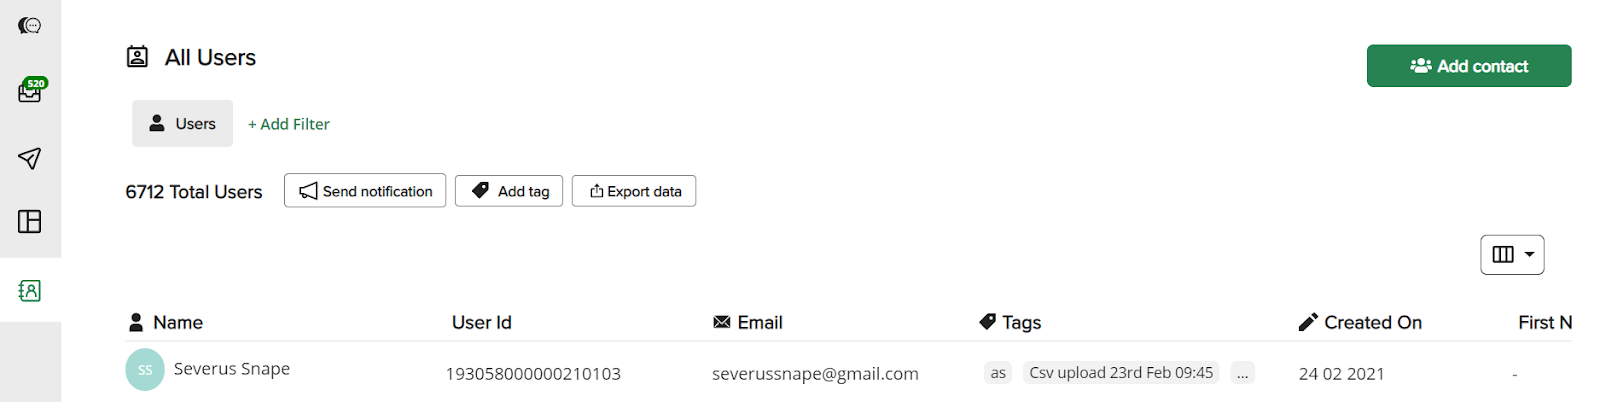
• You could also check the result on your interakt account:
– Refresh the ‘Users’ page to see if the new user got added there or not.
To check whether modification of the contact in your CRM / store translates into the contact being modified on interakt, this is what you need to do: • Modify one of the field values of the contact you added (the field should have been used in the ‘Request Data’ above) • Again, test the Zap in Zapier • Check if the modules get executed. • Go to your interakt account’s user page to check if the contact details got updated there