You can now send Marketing Templates with a Checkout Button from Interakt. Your customers can pay for the product within WhatsApp with WhatsApp Business API itself without having to leave the chat.
This can be a very effective way to improve conversions from your promotional campaigns.
Steps to set this live:
– Activate WhatsApp Pay
– Create a Marketing Template with Checkout Button
– Send a Campaign using the Template
– See the order details appear in Interakt
Activate WhatsApp Pay
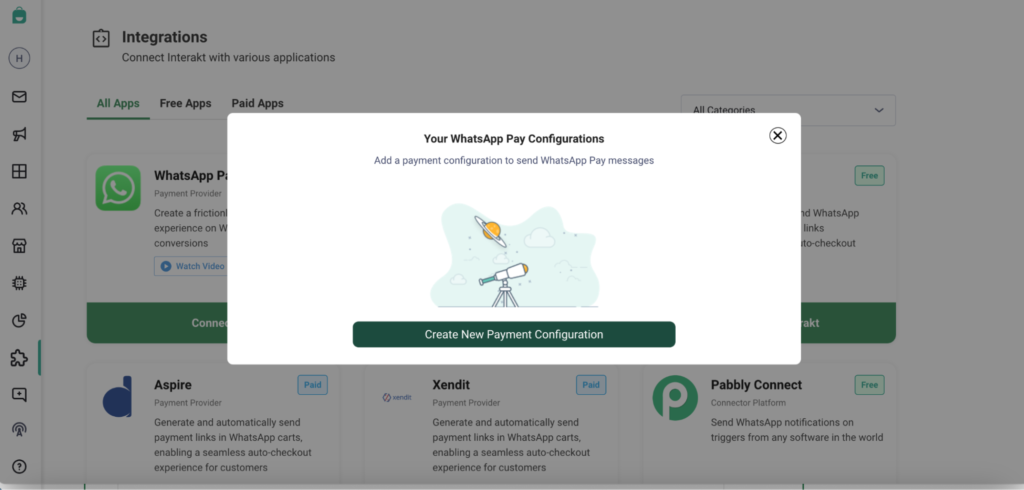
– Go to Integrations page in Interakt.
– Click on ‘Connect’ on the WhatsApp Pay app card.
– You’ll then have to create a new Payment Configuration.
– Next, provide a Payment Configuration Name, select your Payment Gateway, Type of Goods and configure a Payment Confirmation message.
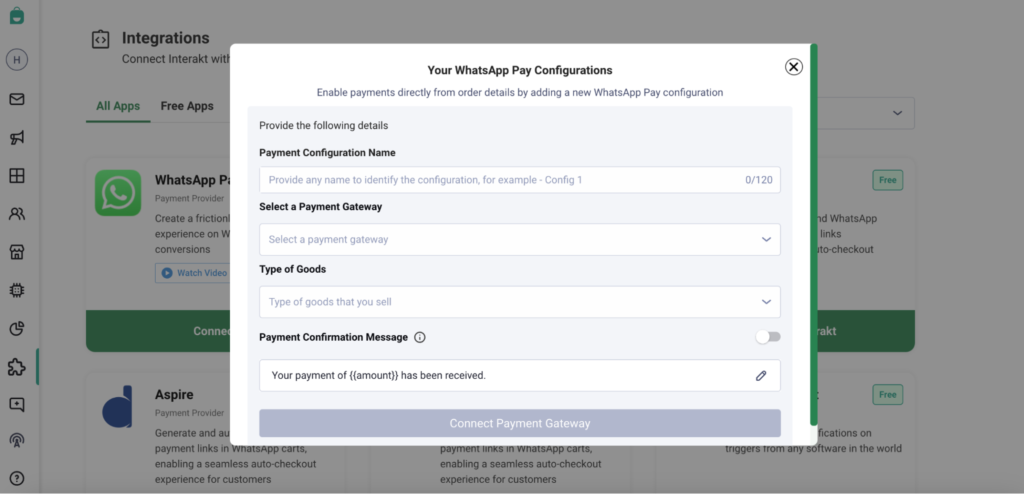
• Next, click on ‘Connect Payment Gateway’.
• Next, you will be redirected to your selected Payment Gateway’s login page. Image below shows the experience for Razorpay.
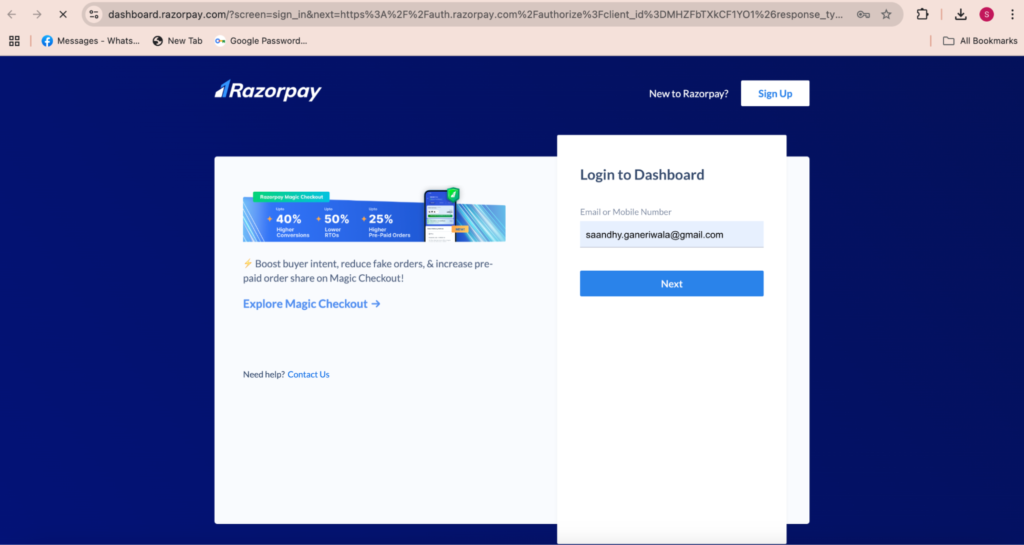
• After logging into your Payment Gateway’s account, you’ll be asked to give permission to WhatsApp for creating new payments.
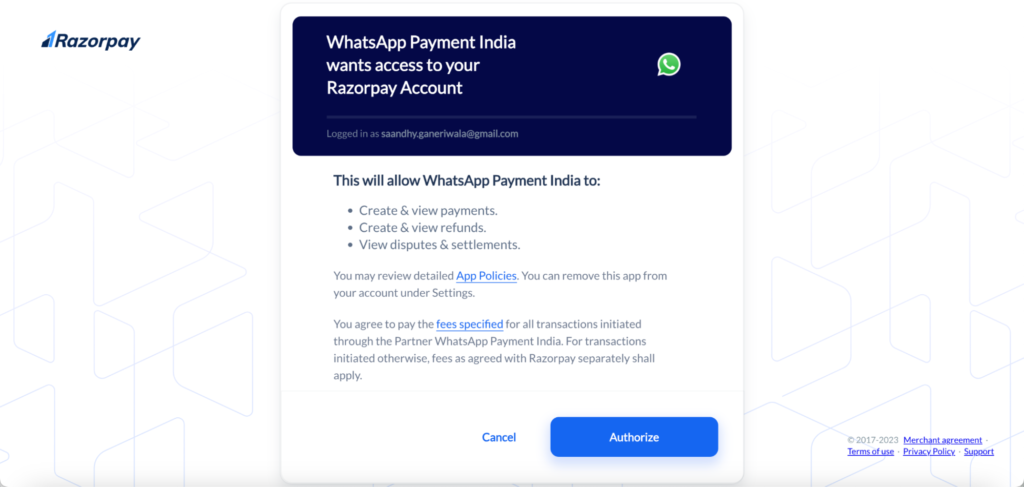
– After clicking on Authorize, you will be shown the below success screen. Click on ‘Go to Redirect URL’.
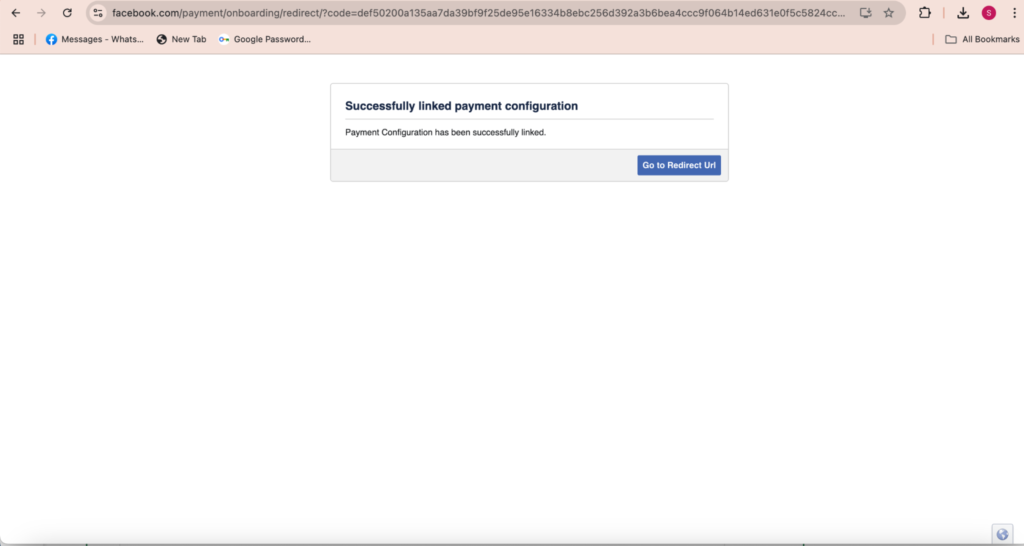
– You’ll be taken back to Interakt where the WhatsApp Pay app card will appear as Connected.

– Next, click on Configure. The configuration you just created will show in the list.
– If the status is Active, you can simply select the configuration and click on Save.
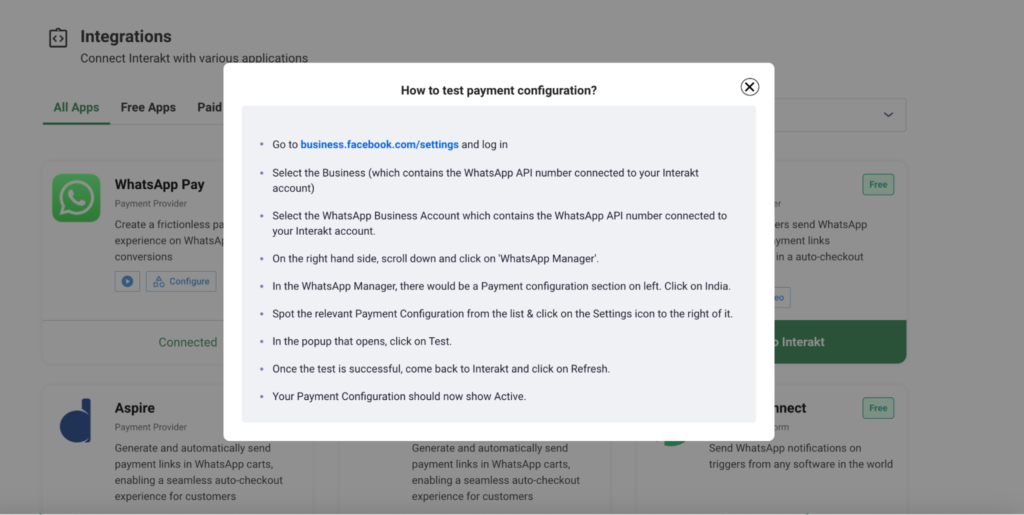
– If the status is Needs Testing, please click on the Test button. It will show you some instructions for how you can test the configuration.
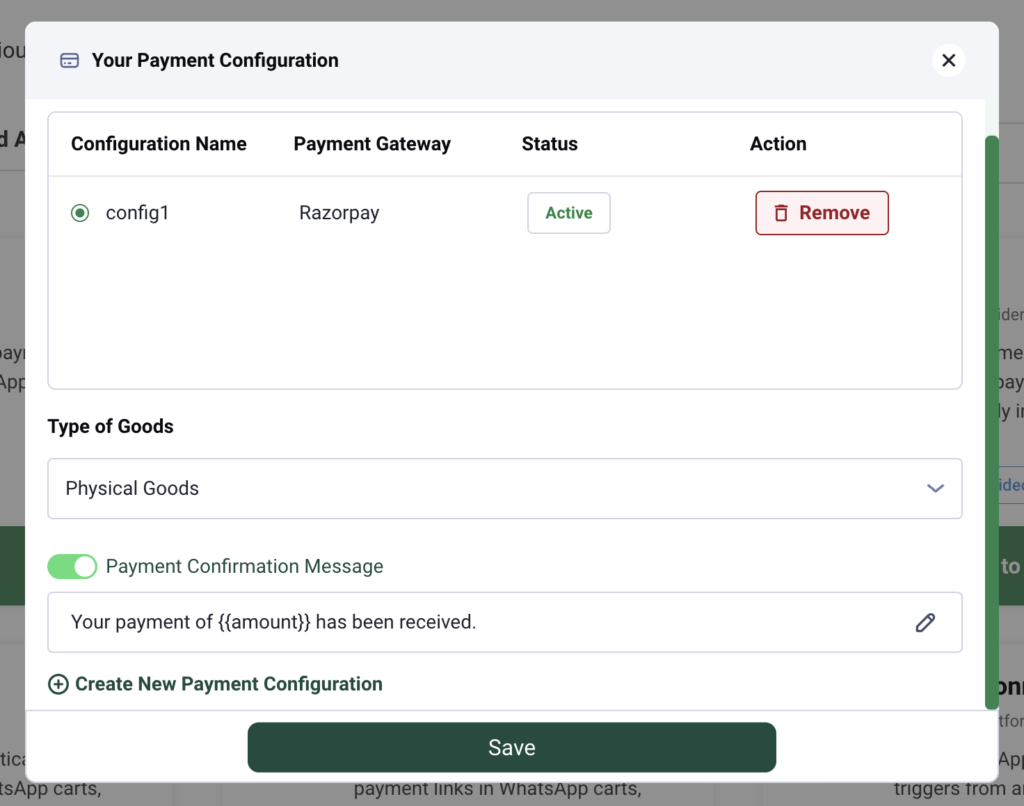
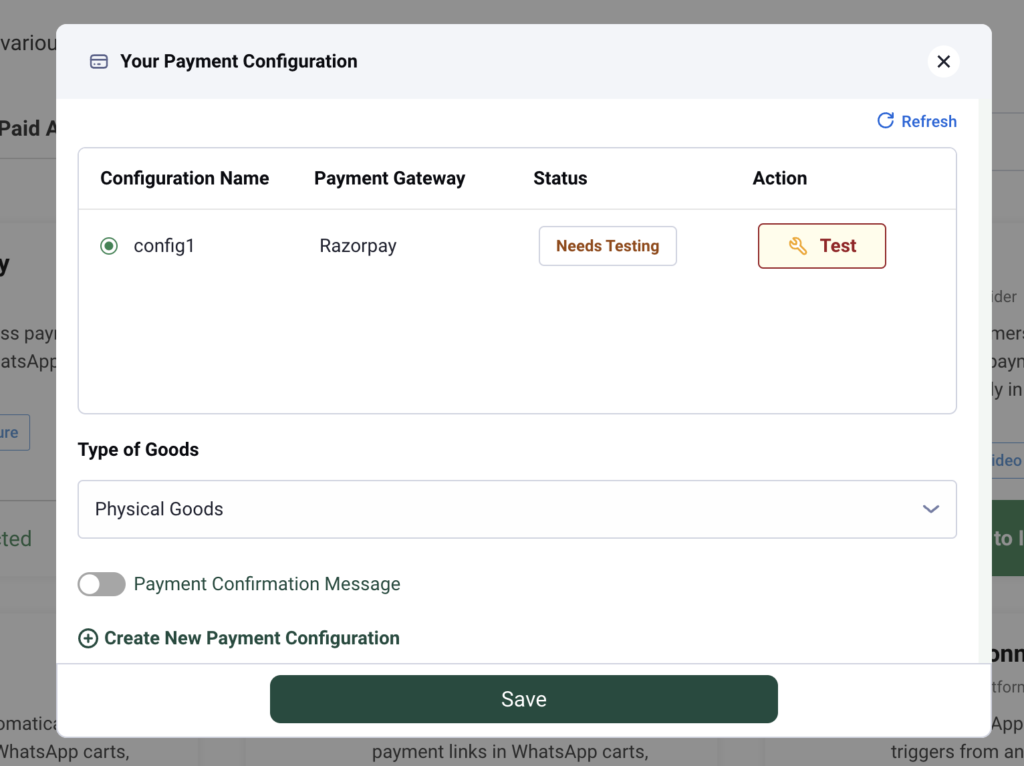
Payment Confirmation Message:
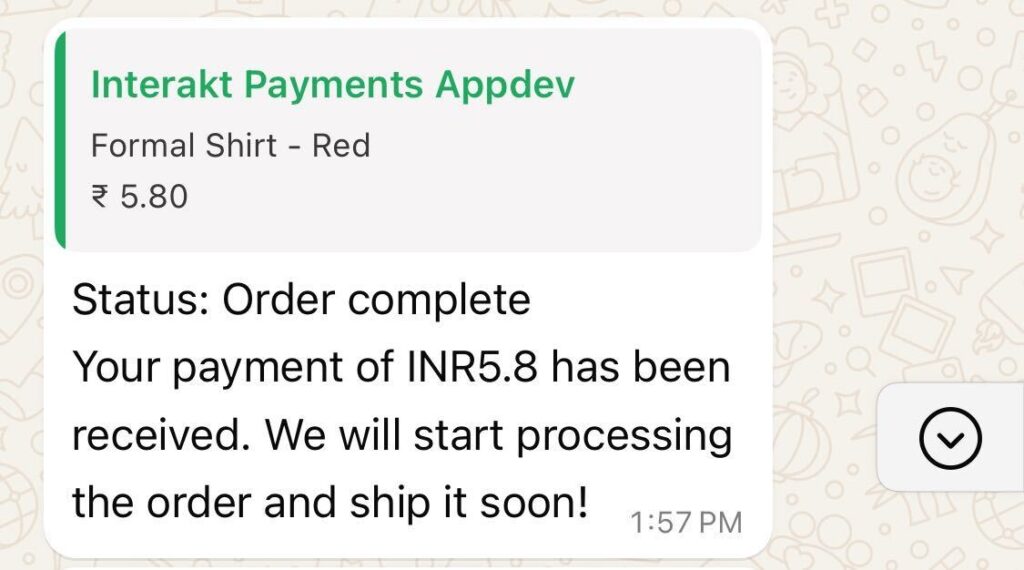
– After having created a payment configuration, you can also enable the payment confirmation (order_status) message.
– You can choose to enable the default message, or you can edit it as well.

– Once enabled, this message will be sent to your customer automatically, as soon as a payment is received from them (shown below).
Create a Marketing Template with Checkout Button
-Go to the Templates page in Interakt.
-Click on Active tab & then click on Create New.
Provide a Template Name.
– Choose Category as Marketing.
– Choose ‘Button Type’ as ‘WhatsApp Pay;.
– Next, you can select 2 types of templates:
– Carousel
– Single Media
– Select the template language.

Single Media Marketing Template with Checkout Button
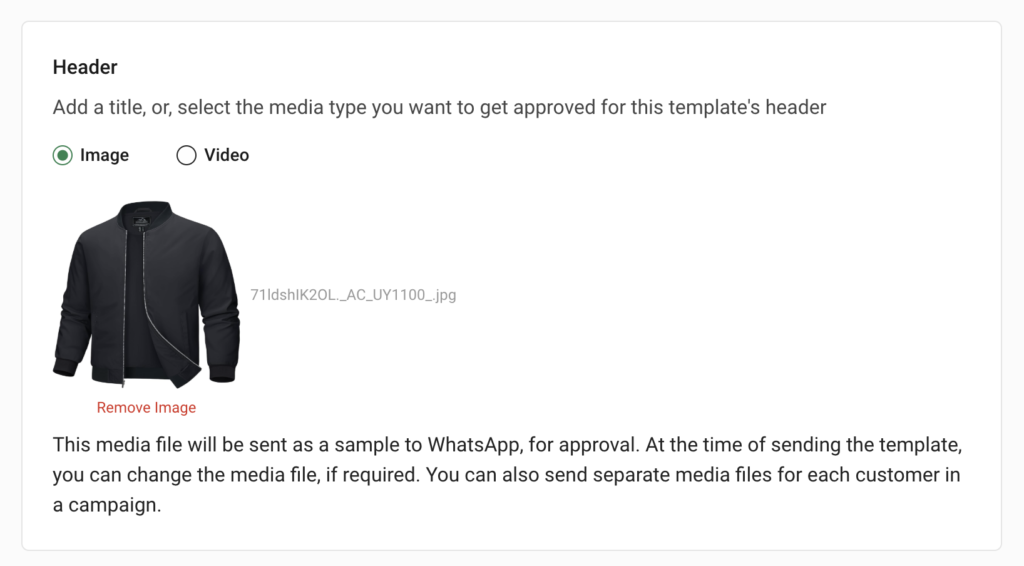
– First, upload an image or video, showing the product you are looking to sell.
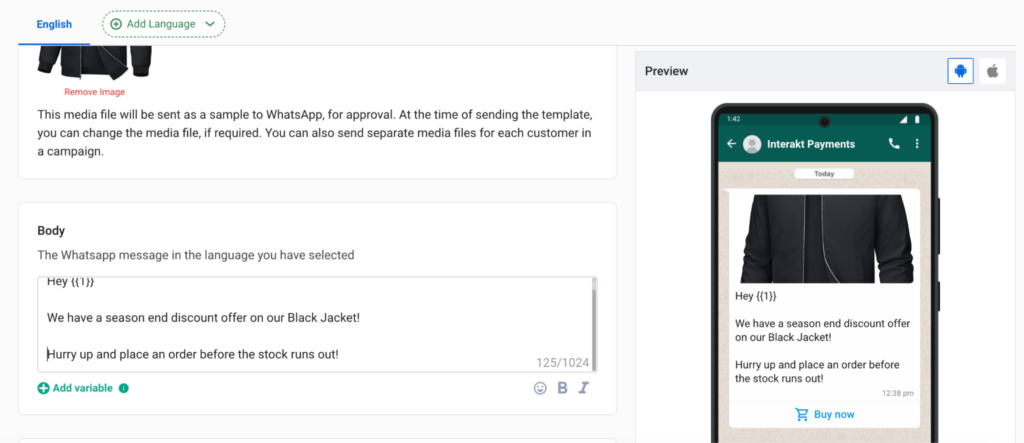
– Next, provide a template body.
– Next, provide details of the product that you are selling:
• Send the same product: if you want to show the same product to all customers, then select ‘Send the same product’. You will then be required to enter all the below details:
1. Product Name
2. Original price
3. Quantity
4. Tax Amount
5. Discounted Price
6. Shipping Cost
7. Order Discount
8. Country of Origin
9. Address Details of Importer / Your company in case it wasn’t imported

• Send Different Products: If you want to send different products to different customers, then select ‘Send Different Products’. In this case, you won’t be asked to provide the product details right away. You can send the product details for each customer separately, as part of the Events track API call that you make for sending the message.

– Next, you can choose to add up to 2 Quick Reply Buttons in the template.

– If there are any variables in your template body, make sure you add samples for the variables.
– Next, Submit the template and wait for approval.
Carousel Marketing Template with Checkout Button
• No header needs to be provided.
• Provide a body for the template.
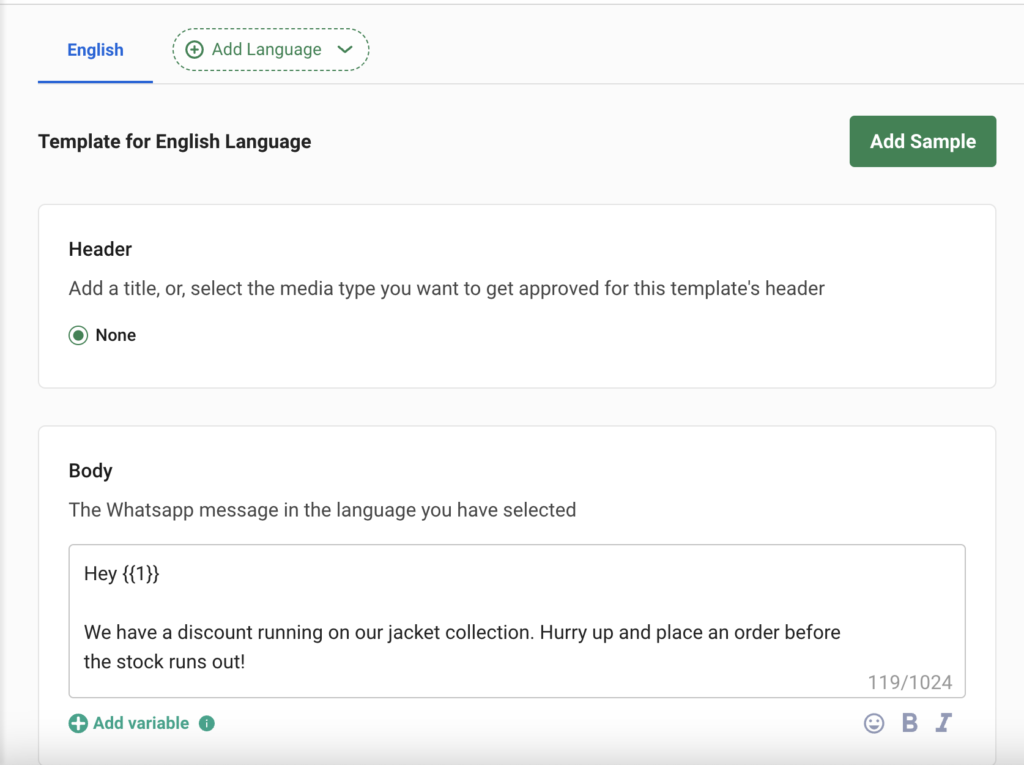
– For each carousel card, specify:
– a card header image (product image)
– text for the card body (product description)
– Whether you want to send the same product to all customers or different products to different customers
– Send the same product: if you want to show the same product to all customers, then select ‘Send the same product’. You will then be required to enter all the below details:
Product Name
Original price
Quantity
Tax Amount
Discounted Price
Shipping Cost
Order Discount
Country of Origin
Address Details of Importer / Your company in case it wasn’t imported
– Send Different Products: If you want to send different products to different customers, then select ‘Send Different Products’. In this case, you won’t be asked to provide the product details right away. You can send the product details for each customer separately, as part of the Events track API call that you make for sending the message.
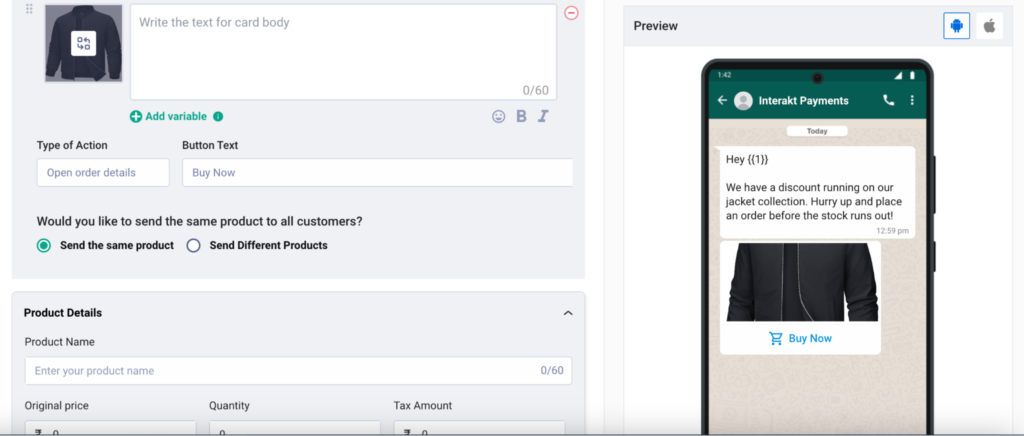
– In every Carousel Card, you can add a Quick Reply Button as well, apart from the Checkout ‘Buy Now’ button.
– You can add more Carousel Cards (upto 10).
– If there are any variables in your template body, make sure you add samples for the variables.
– Finally, you can submit your template for approval.
Send a campaign using the template
Once your template with the checkout button has been approved, you can send it via a campaign.
– Go to Notifications page.
– Click on ‘New Campaign’ -> ‘Start from Scratch’
– Provide a Campaign Name
– Choose campaign type:
– Onetime – If you want to send the same product to all customers as a onetime blast, select Onetime.
– Ongoing – If you want to send different products to different customers, select Ongoing. Here, you will need to call our APIs to trigger the messages & include product details for each customer in the API call.
Onetime Campaign with Marketing Template having Checkout Button
– Choose the Marketing template with a Checkout Button, that you just created.
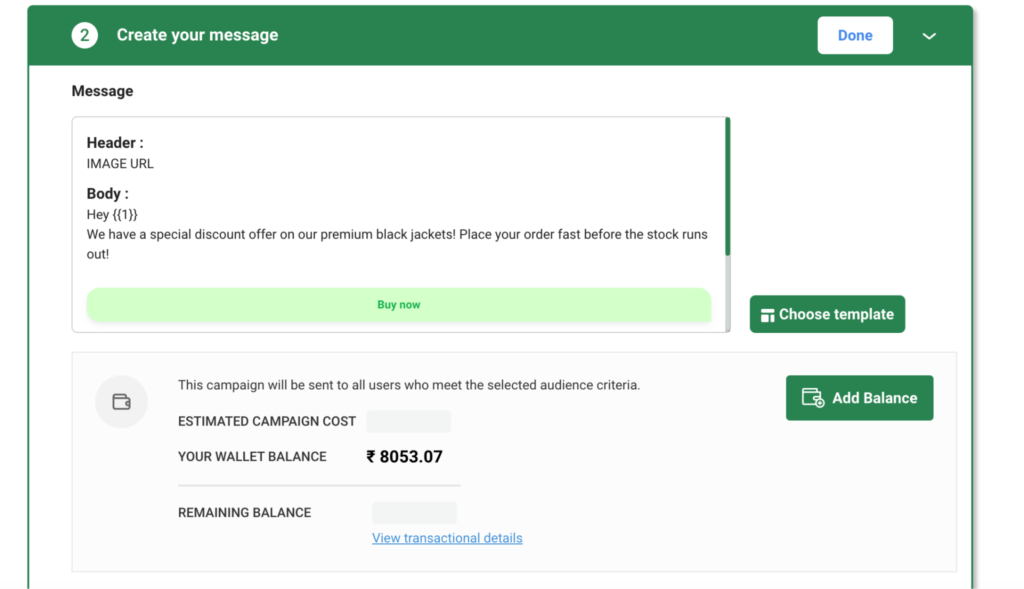
– In case you select the single media marketing template, you can change the header image if you wish.
– Map any variables in the template body to fields (traits) like Name.
– Since its a onetime campaign, the ‘Send the same product’ option is the default & only option possible.
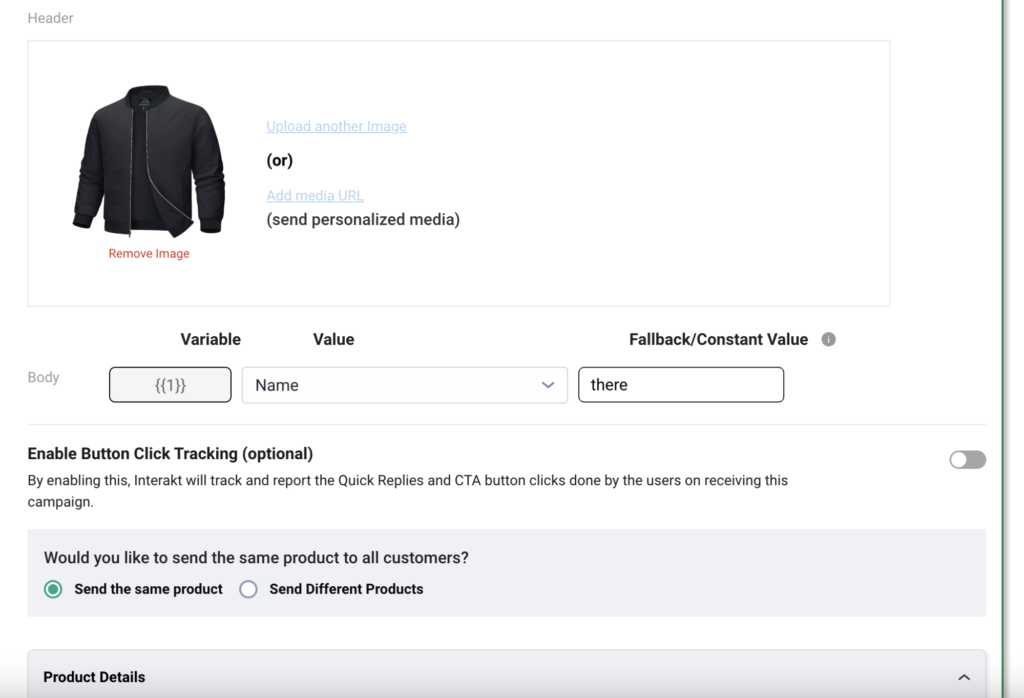
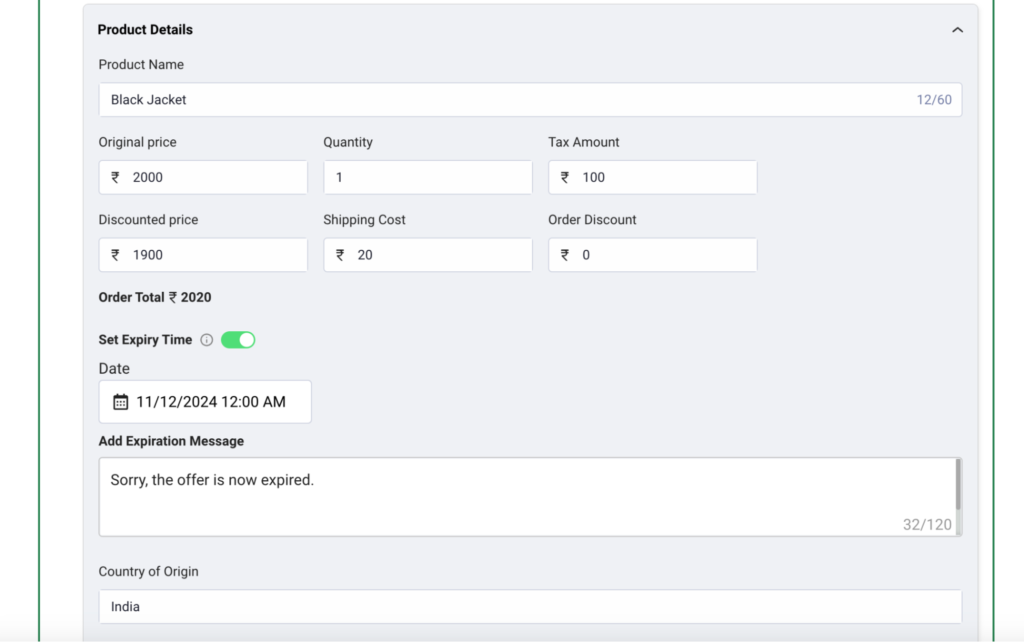
– You can change the product details that you had provided while creating the template.
– IMP -> Make sure you specify an expiration date time for the template. This will ensure that you can run time-bound offers. If you specify an expiration date time, you will have to configure an expiration message which will be shown to your customers after the offer has expired.
– Next, you can set post-reply-flows like Opt Out Flow etc on the Quick Reply buttons in your template.
– You can specify the scheduling ie whether you want to send the template immediately or at a later time.
– You can even configure up to 7 retries for the campaign message (which would be sent out at a gap of 24 hours).
Finally, you can set the campaign live!
Ongoing Campaign with Marketing Template having Checkout Button
• Configure the trigger for the Ongoing Campaign. Here, you need to select the event that you will trigger via APIs.
• Choose the Marketing template with a Checkout Button that you just created.
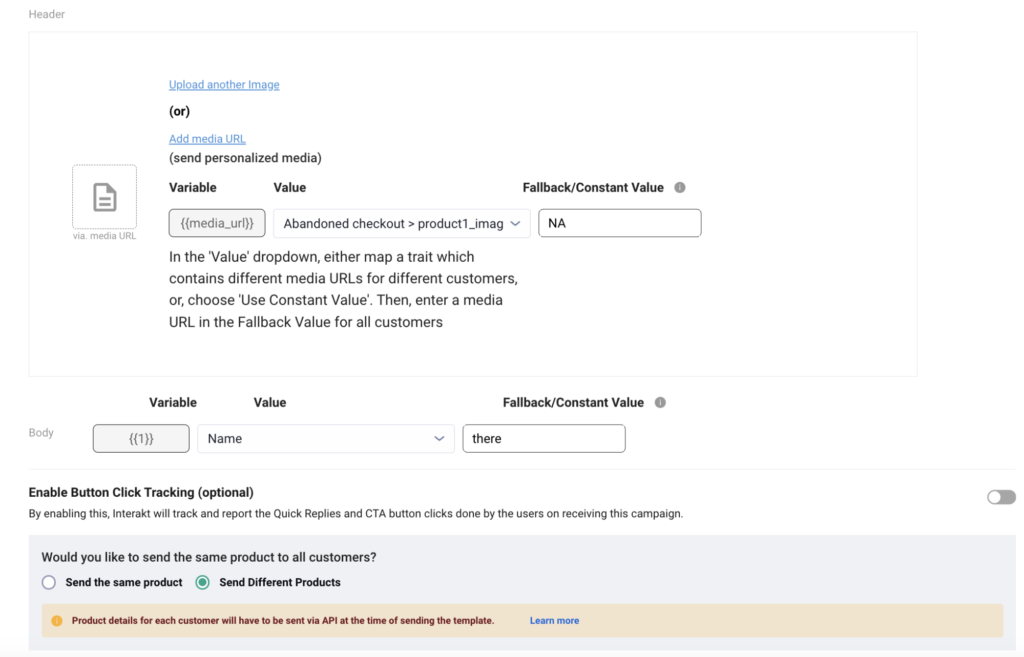
• If the template had a single media header, you can either:
– Upload a single media file as the header, which will be sent to all customers.
– However, since your use case is to send different products to different customers, you might want to keep the header image dynamic. To do that, you can map the header variable to an event trait, and in the Event Track API call you can send the product_url as that event trait’s value.
• Map any variables in the template body to fields (traits) like Name.
• Since it’s an Ongoing campaign, the ‘Send different products’ option is the default & only option possible.
• Set the campaign live.
• After you have set the campaign live, you need to call Interakt’s User and Event track APIs to send these templates to your customers.
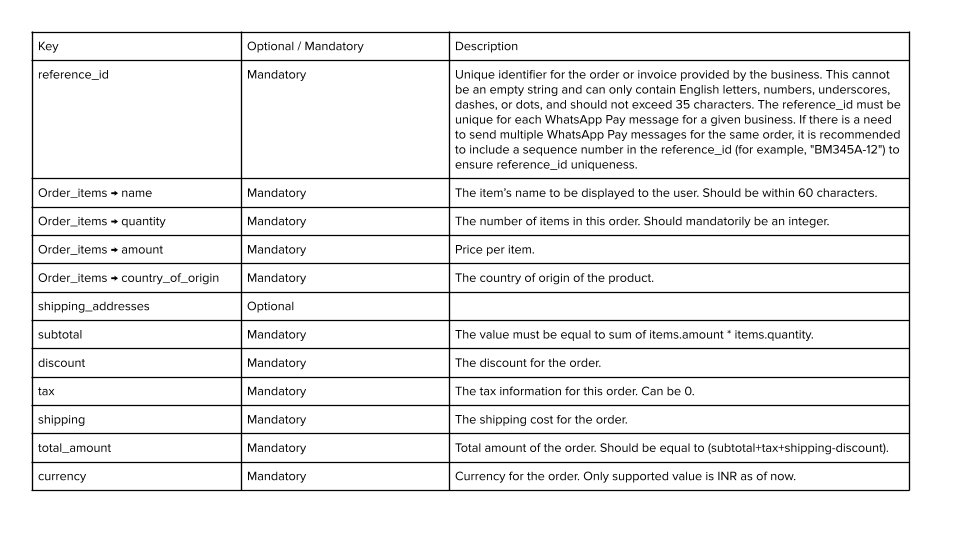
Sample API Curl for sending a carousel template via Ongoing Campaign:
Curl 1 -> With Shipping Address - if this is used, the provided shipping addresses will show to the end customer for selection
					curl --location 'https://api.interakt.ai/v1/public/track/events/' \
--header 'Content-Type: application/json' \
--header 'Authorization: Basic <api_key>' \
--data '{
    "phoneNumber": "9028297253",
    "countryCode": "+91",
    "event": "qualified for discount offer",
    "traits": {
    "order_details" : [{
        "reference_id": "NOV25009",
        "order_items": [
            {
                "name": "Strawberry Cake",
                "quantity": 1,
                "amount": 1,
                "country_of_origin": "India"
            }
        ],
        "shipping_addresses": [
            {
                "name": "Akhil Kumar",
                "phone_number": "919000090000",
                "address": "Bandra Kurla Complex",
                "city": "Mumbai",
                "state": "Maharastra",
                "in_pin_code": "400051",
                "house_number": "12",
                "tower_number": "5",
                "building_name": "One BKC",
                "landmark_area": "Near BKC Circle",
                "country":"IN"
            }
        ],
        "subtotal": 1,
        "discount": 0,
        "tax": 0,
        "shipping": 0,
        "total_amount": 1,
        "currency": "INR"
    },
{
        "reference_id": "NOV250010",
        "order_items": [
            {
                "name": "Chocolate Cake",
                "quantity": 1,
                "amount": 1,
                "country_of_origin": "India"
            }
        ],
        "shipping_addresses": [
            {
                 "name": "Akhil Kumar",
                "phone_number": "919000090000",
                "address": "Bandra Kurla Complex",
                "city": "Mumbai",
                "state": "Maharastra",
                "in_pin_code": "400051",
                "house_number": "12",
                "tower_number": "5",
                "building_name": "One BKC",
                "landmark_area": "Near BKC Circle",
                "country":"IN"
            }
        ],
        "subtotal": 1,
        "discount": 0,
        "tax": 0,
        "shipping": 0,
        "total_amount": 1,
        "currency": "INR"
    }]
  }
}'
Curl 2 -> Without Shipping Address - if this is used, the end customer will have to mandatorily enter a address at their end
					curl --location 'https://api.interakt.ai/v1/public/track/events/' \
--header 'Content-Type: application/json' \
--header 'Authorization: Basic <api_key>' \
--data '{
    "phoneNumber": "9028297253",
    "countryCode": "+91",
    "event": "qualified for discount offer",
    "traits": {
    "order_details" : [{
        "reference_id": "NOV25009",
        "order_items": [
            {
                "name": "Strawberry Cake",
                "quantity": 1,
                "amount": 1,
                "country_of_origin": "India"
            }
        ],
          "subtotal": 1,
        "discount": 0,
        "tax": 0,
        "shipping": 0,
        "total_amount": 1,
        "currency": "INR"
    },
{
        "reference_id": "NOV250010",
        "order_items": [
            {
                "name": "Chocolate Cake",
                "quantity": 1,
                "amount": 1,
                "country_of_origin": "India"
            }
        ],
        "subtotal": 1,
        "discount": 0,
        "tax": 0,
        "shipping": 0,
        "total_amount": 1,
        "currency": "INR"
    }]
  }
}'
Notes:
– Before passing an event for a customer, the customer should have been added to your Interakt account. You can add customers via CSV Upload or via the User Track API.
The identifier for the customer in the Event track API call is any of the below:
– userId (this can be used if a user_id was specified while adding the customer via the User Track API call)
– phoneNumber & countryCode (the above curl uses this identifier)
– fullPhoneNumber (this is the combined country code & phone number of the customer. If your customer’s country code is 91 & phone number is 9999999999, then, the fullPhoneNumber would be 919999999999)
– The {{API_Key}} shown in the curl (which is to be passed in the headers) will be available in your Interakt account’s Developer Settings.
– In the ‘traits’ object, you can pass custom ‘event traits’ in the form of key-value pairs. In the above curl, these ‘event traits’ are the ones shown below. These ‘event traits’ can then be mapped to variables (placeholders) in your message template, or could even be used to filter (segment) the ‘audience’ for your campaign.
– To be able to send a WhatsApp Pay message upon triggering an event via APIs, it is mandatory to pass the “order_details” object within the “traits” object.
