How to create WhatsApp Templates
If you are using a WhatsApp API number and you want to reach out to a customer, who has not messaged you in the previous 24 hours, then it is mandatory that you use a pre-approved WhatsApp template to start the conversation. These templates are messages that are approved by WhatsApp, and can be sent to customers only after the approval.
Broadly there are two kinds of templates:
Default WhatsApp Templates for TallyPrime
⁃ After connecting a number to your WhatsApp API account, you will find 12 templates added in your Tally X Interakt account by default. (To use these 12 templates from TallyPrime, you will need to activate your subscription, and also wait for these 12 templates to get approved.)
⁃ These 12 templates are:
‣ Party Template for Vouchers (Image)
‣ Party Template for Vouchers (PDF)
‣ Common Template for Vouchers (Image)
‣ Common Template for Vouchers (PDF)
‣ Common Template for Reports (Image)
‣ Common Template for Reports (PDF)
‣ Common Template with Payment Link (Image)
‣ Common Template with Payment Link (PDF)
‣ Party Template with Payment Link (Image)
‣ Party Template with Payment Link (PDF)
‣ Employee Template for Pay Slip (Image)
‣ Employee Template for Pay Slip (PDF)
⁃ To confirm if these 12 templates have been added or not, go to the Templates page in the Interakt panel.
⁃ The approval of these templates can take up to 24 hours.
⁃ After these templates have been approved, you will find these templates in TallyPrime.
Know more about how to use these templates for sharing documents from TallyPrime.
Custom WhatsApp Templates created by you in your Interakt account
Templates created in your Interakt account can be sent to your customers via any of the following methods:
• TallyPrime (only Utility category templates having image / document header, having no variables in body and having no dynamic CTA button)
• Interakt Inbox (all templates can be sent)
• Interakt One-time Notification campaign (all templates can be sent)
How to create Custom WhatsApp Templates
• Go to the Templates page in the Interakt panel and click ‘Create New’ on the top right.

• Provide a template name.

• Choose a ‘Meta Category’ for the template.

There are 3 categories –
⁃ Utility – Utility templates typically start a conversation that facilitate a specific, agreed-upon request or transaction, or update a customer about an ongoing transaction. These may include transaction confirmations, transaction updates, and/or post-purchase notifications.
When you start a conversation with an Indian number, using a Utility category template, the cost for that conversation will be Rs 0.3082 (approximately 31 paise).
⁃ Marketing – Marketing templates typically start conversations that include promotions or offers, informational updates, or invitations for customers to respond or take action.
When you start a conversation with an Indian number, using a Marketing category template, the cost for that conversation will be Rs 0.7265 (approximately 73 paise).
⁃ Authentication – Authentication templates typically start conversations that enable you to authenticate users with one-time passcodes, potentially at multiple steps in the login process (for example, account verification, account recovery, integrity challenges).
Note that Authentication templates are currently not supported.
If the ‘Meta Category’ of the template is Utility, you will be required to choose a ‘Custom category’ for the template. There are two categories – Reports and Transactions. Depending on whichever category you choose, the template will appear in that respective category in TallyPrime.

⁃ Next, choose the language in which you want to create the template. You can also choose multiple languages. If you choose to create a template in multiple languages, you will be required to provide the content of the template separately for each language.

⁃ Next, you need to decide if your template will have a header or not.
‣ Text header (Templates with Text header cannot be used from TallyPrime. They can only be sent from Interakt Inbox / Interakt Campaigns):
‣ If you use a text header, it will appear as a ‘heading in bold font’ in the final WhatsApp message that goes to your customer

You can even include a variable {{1}} in the text header.
‣ If you include a variable, you will later have to provide a value for the variable when you send the template to customers. If you are sending a campaign to lots of customers, you can map a customer field (like Name, E-mail, Phone No., and so on etc) to the variable. This would ensure that, for every customer, the variable’s value will be as per that customer.
‣ However, note that if you include a variable, the template will not be available in TallyPrime. You can only use the template from Interakt Inbox or Interakt Campaigns.
⁃Media header (Image / Video / Document):
‣If you use a media header, it will appear as shown below in the final WhatsApp message that goes to your customer.

⁃ The media file that you provide at the time of template creation is just used as a sample by WhatsApp, while reviewing the template. Hence, try providing a media which is similar to the media that you will ultimately send to customers (as part of this template).
⁃ Later, when the template is approved and you want to send it to customers, you are free to attach some other media (which might not be the sample one) in the header.
Next, you will be required to provide the ‘Body’ of the template.
⁃ This is the main message that will be sent to your customer.
⁃ In the ‘body’ you can include multiple variables like {{1}}, {{2}}, {{3}} and so on.
‣ If you include variables, you will later have to provide a value for the variable when you send the template to customers. If you are sending a campaign to lots of customers, you can map customer fields (like Name, E-mail, Phone No., and so on) to the variable. This would ensure that, for every customer, the variable’s value will be as per that customer.
‣However, note that if you include a variable, the template will not be available for sending documents from TallyPrime. You can only send the template from Interakt Inbox or Interakt Campaigns.

• Next, you can provide a ‘Footer’ in the template.
‣ Providing a ‘Footer’ is optional.
‣ If added, a ‘Footer’ would appear in the actual message that is sent to your customer on WhatsApp, as shown in the following image.
‣ No variables can be added in the ‘Footer’.

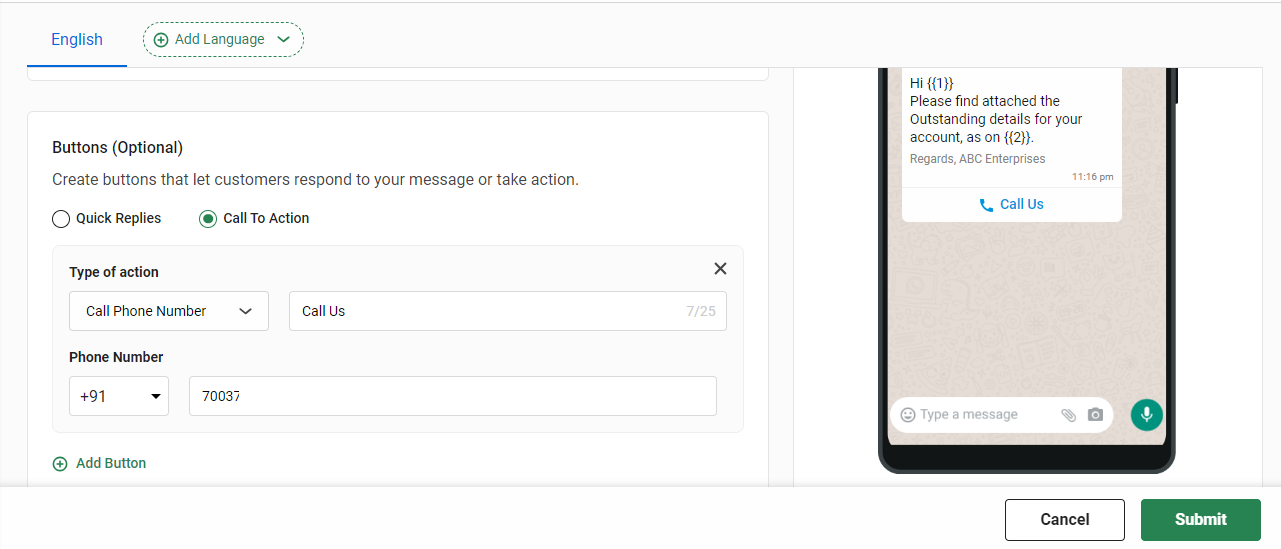
• Next, you can choose to add a button in the template.
‣ Buttons are broadly of two types:
1. Quick Reply Buttons
⁃ Quick reply buttons can be added, as shown below.

⁃ Quick reply buttons are a great way to induce customers to reply to your message. It eliminates any effort from the customer’s end, to type a reply. The customer can simply tap on a button to reply.
⁃ At max, three quick reply buttons can be included in templates.
⁃ The button text in a Quick Reply button can contain a maximum of 25 characters.
⁃ While sending templates of Marketing category, it is highly recommended to include a Quick Reply button with the button text as ‘STOP’. This is useful in scenarios where a recipient might find the message to be irrelevant. In such a situation, the recipient might want to mark the message as Spam in WhatsApp. However, if the recipient sees the ‘STOP’ button, they are more likely to click it instead of marking the message as spam. This would hence save your WhatsApp API number’s quality rating from getting degraded.
2. Call to Actions
– Can be of two types:
‣ ‘Call Phone Number’ button – When this button is clicked by the recipient, the phone’s dialer will automatically open with a phone number pre-entered in the dialer.
‣‘Visit Website’ button – When this button is clicked by the recipient, he/she is redirected to the URL contained by the button.
‣ To add a ‘Call Phone Number’ CTA button, you will need to provide the button text and the phone number, which would be called, when the button is clicked.

⁃ ‘Visit Website’ buttons can be of two types:
‣ Static – For a Static button, you will have to provide the button text and the static URL of

⁃ Dynamic – For a Dynamic button, you will have to provide the button text and the dynamic URL of the website. The dynamic URL can further be provided in two ways:
‣ Dynamic portion of URL as a variable – The URL that you have provided should have a variable in place of the dynamic portion of the URL. If your actual URL is www.example.com/order/12345 where 12345 is the dynamic part, you should enter the URL as www.example.com/order/{{1}}. You can map {{1}} to a customer field that contains the dynamic portion for each customer.

⁃ Full URL as a variable – Provide the dynamic URL as https://api.interakt.ai/cta?redirect={{1}}. You can map {{1}} to a customer field that contains the complete URL for each customer.

⁃ Finally, once you click ‘Submit’, you will be prompted to provide some Sample Values, if your template header, body, or buttons contained any variables.
‣ These sample values are just indicative values that must be provided for WhatsApp to understand how you intend to use those variables.
‣ If your template has a media header and you have uploaded the sample media file already, you will see it already submitted in this ‘Add Sample Content’ popup.


⁃ After having provided the sample values, you can click ‘Submit’ again. Your template would then get submitted.
⁃ After submission, you will see the following popup, informing you that it might take WhatsApp anywhere between 1 minute to 24 hours to review your template.

⁃ Till the template has been reviewed, the status of the template will appear as ‘Pending’. Once WhatsApp has done the review, the latest status of the template generally gets updated automatically. Alternatively, you can also click ‘Sync’ to fetch the latest statuses of the templates.

Best Practices for Creating Templates:
While creating templates, make sure you avoid these common mistakes.
How to edit a rejected template
If your message template is rejected, you can edit it and resubmit it for approval from Interakt. While editing, please make sure you avoid the common mistakes that lead to rejections.
• Go to https://app.interakt.ai/templates/list?segment=active.
• Search for the template that you want to edit. Then click on the 3 dot menu on the right and click ‘Edit’, as shown below.

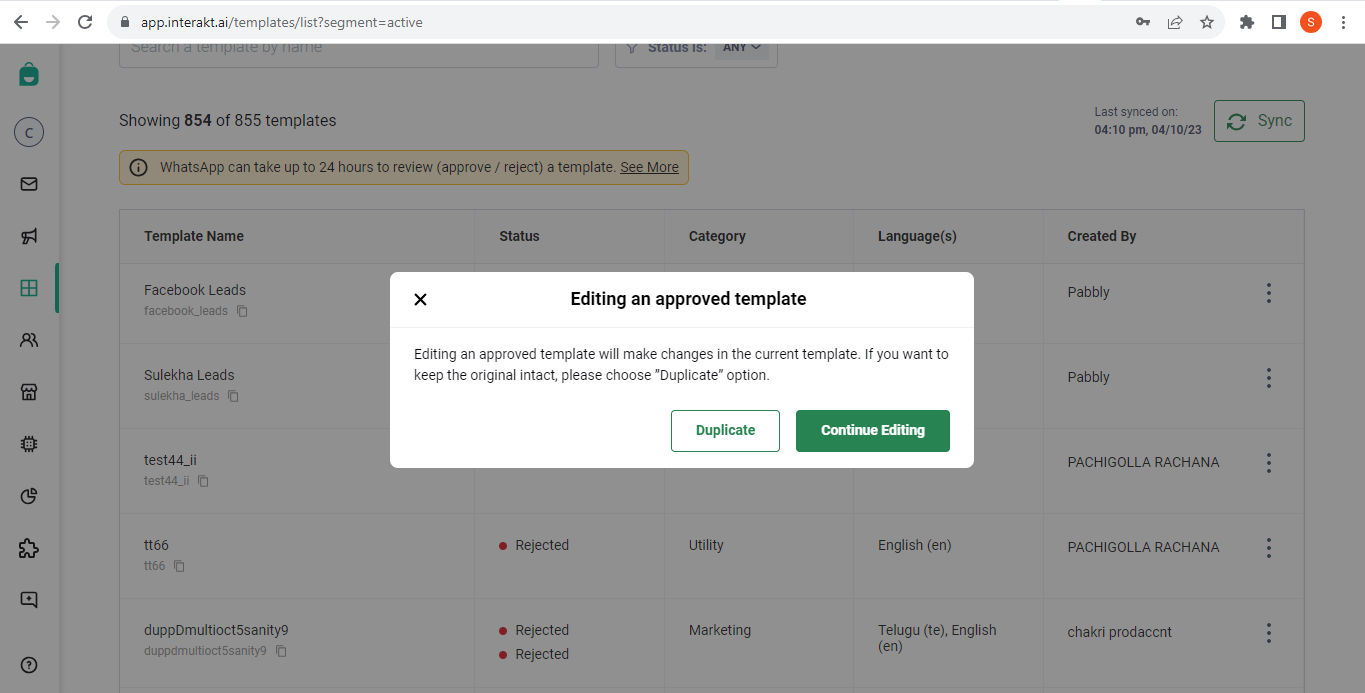
⁃ Next, click ‘Continue Editing’ as shown below.

– In the Editing Template screen, you can make changes to the template’s Header, Body, Footer and Buttons. Click ‘Resubmit for Approval’.

How to raise review request for a rejected template
If your template is repeatedly getting rejected, you can raise a review request with WhatsApp directly, by following the steps given below:
– Go to https://business.facebook.com/settings and log into your Facebook Account. Go to the Facebook Business that contains your WhatsApp Business API Account.
– Under Business Settings, go to ‘Business Support Home’ from the left navigation panel, as shown below.

– In the Business Support Home screen , scroll down to the ‘WhatsApp accounts’ section, and click your WhatsApp account, which contains the template that you want to review.

– Click ‘Rejected message templates’.

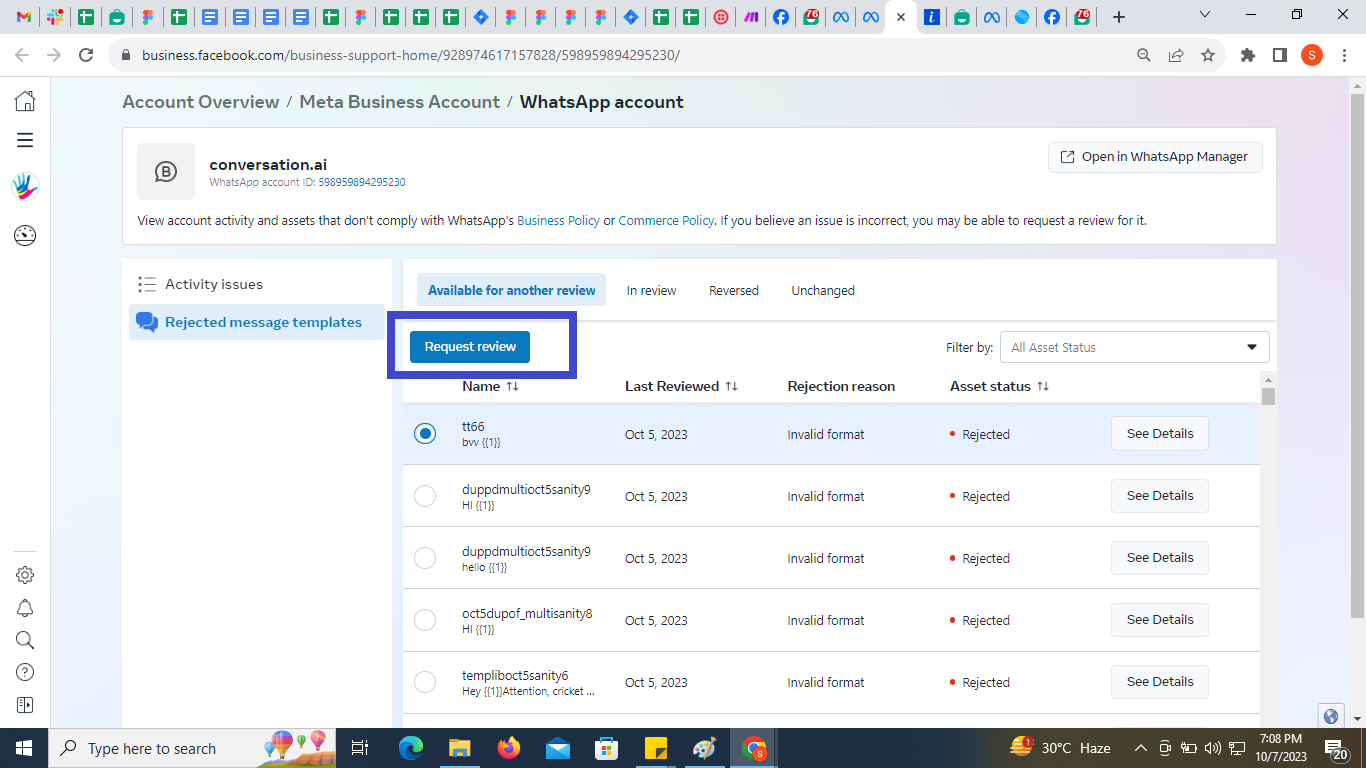
– Select the template that you want to review and click ‘Request Review’.

– Select the Appeal Reason and provide a written reason for why you think the template should not be rejected.

– After submitting the request, check back after 24 to 48 hours to see the results of the review.


